Butterfly nails bring one of nature's most detailed patterns onto a surface small enough that every line matters.
The range covers everything from a single black outline on a clear nail to full monarch wing replicas painted across multiple fingers. Some are beginner-friendly; others need a thin brush and patience.
In this guide
15 Butterfly Nail Ideas
Tap any idea to jump straight to it.
- 1Monarch wing tips
- 2Blue morpho watercolor
- 3Negative space butterfly
- 4Pastel ombre accent
- 5Butterfly wing tip
- 6Gold foil on black
- 7Stained glass butterfly
- 8Holographic wing
- 9Pressed flower & butterfly
- 10Black & white sketch
- 11Pink butterfly on chrome
- 12Swallowtail gradient
- 133D butterfly charm
- 14Emerald green wingspan
- 15Sunset ombre butterfly
1. Monarch Wing Tips on Nude Almond
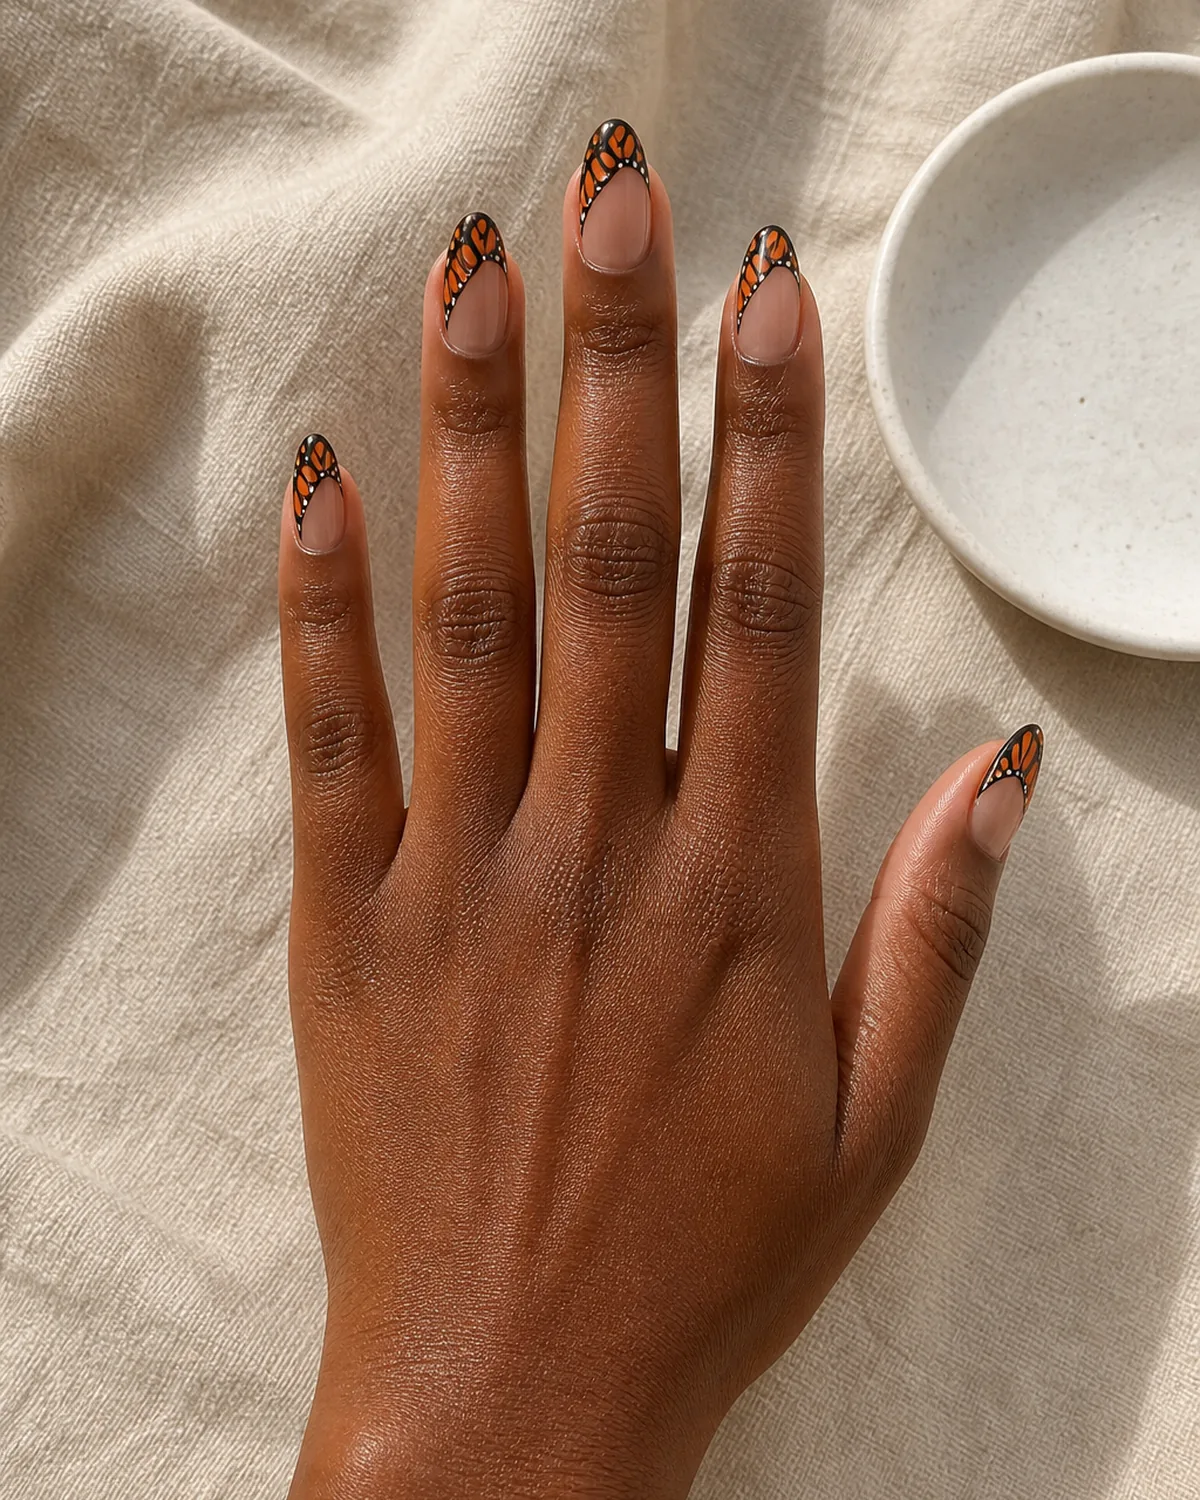
Monarch butterfly wings have a pattern that reads clearly even at nail scale — bold orange sections bordered by black veins with white dot accents along the edges. Painting the wing pattern from the tip inward gives each nail a sense of movement, as if the wing is opening.
Almond shape works well here because the tapered tip mirrors the pointed edge of a real monarch wing. The nude base lets the orange and black pattern do all the visual work without competing color underneath.
- Start with the black vein lines first, then fill the orange sections between them — the veins act as guides that keep the pattern organized
- Add tiny white dots along the black border near the tips to replicate the spotted margin that real monarchs have
- A thin liner brush is essential; anything wider than 2mm will lose the detail that makes this look like a wing and not just orange and black stripes
If you want a subtler take on the butterfly motif, the negative space butterfly further down keeps things minimal. For the opposite direction, the stained glass butterfly goes even bolder with color.
2. Blue Morpho Watercolor on Short Oval
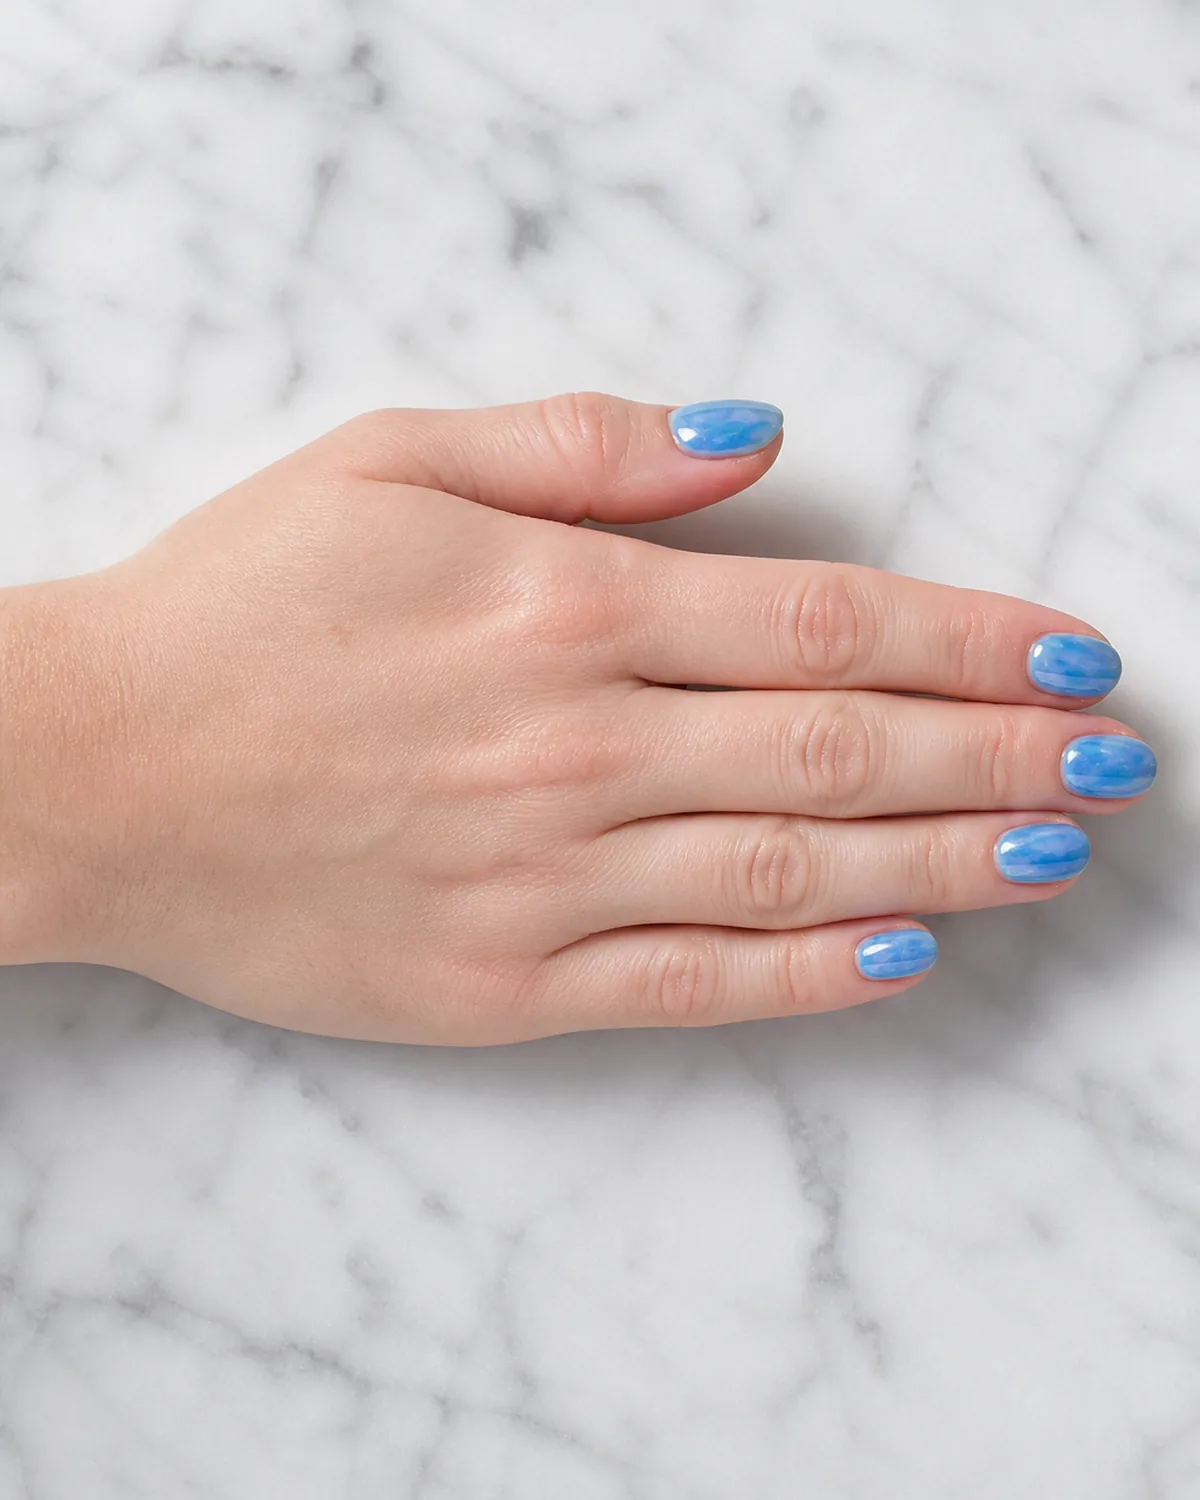
The blue morpho butterfly has a shimmer that changes angle by angle — a quality that translates surprisingly well to nail polish when you use a sheer, iridescent blue wash instead of an opaque coat. The translucent layers catch light differently across each nail, which mimics the way morpho wings shift from deep blue to violet.
Short oval nails give this a wearable, everyday feel. The rounded shape softens the look so it reads as pretty rather than costume-like, even though the color is unmistakably butterfly-inspired.
- Apply in thin, translucent coats rather than one thick layer — the depth comes from seeing through the layers, not from opacity
- A duochrome blue-to-purple polish gets closest to the real morpho effect without needing to layer multiple colors
- Work on a sheer milky or clear base so the blue floats above the natural nail and glows in the light
This pairs well with a chrome nails finish if you want to push the metallic shimmer even further.
3. Negative Space Butterfly on Clear Stiletto
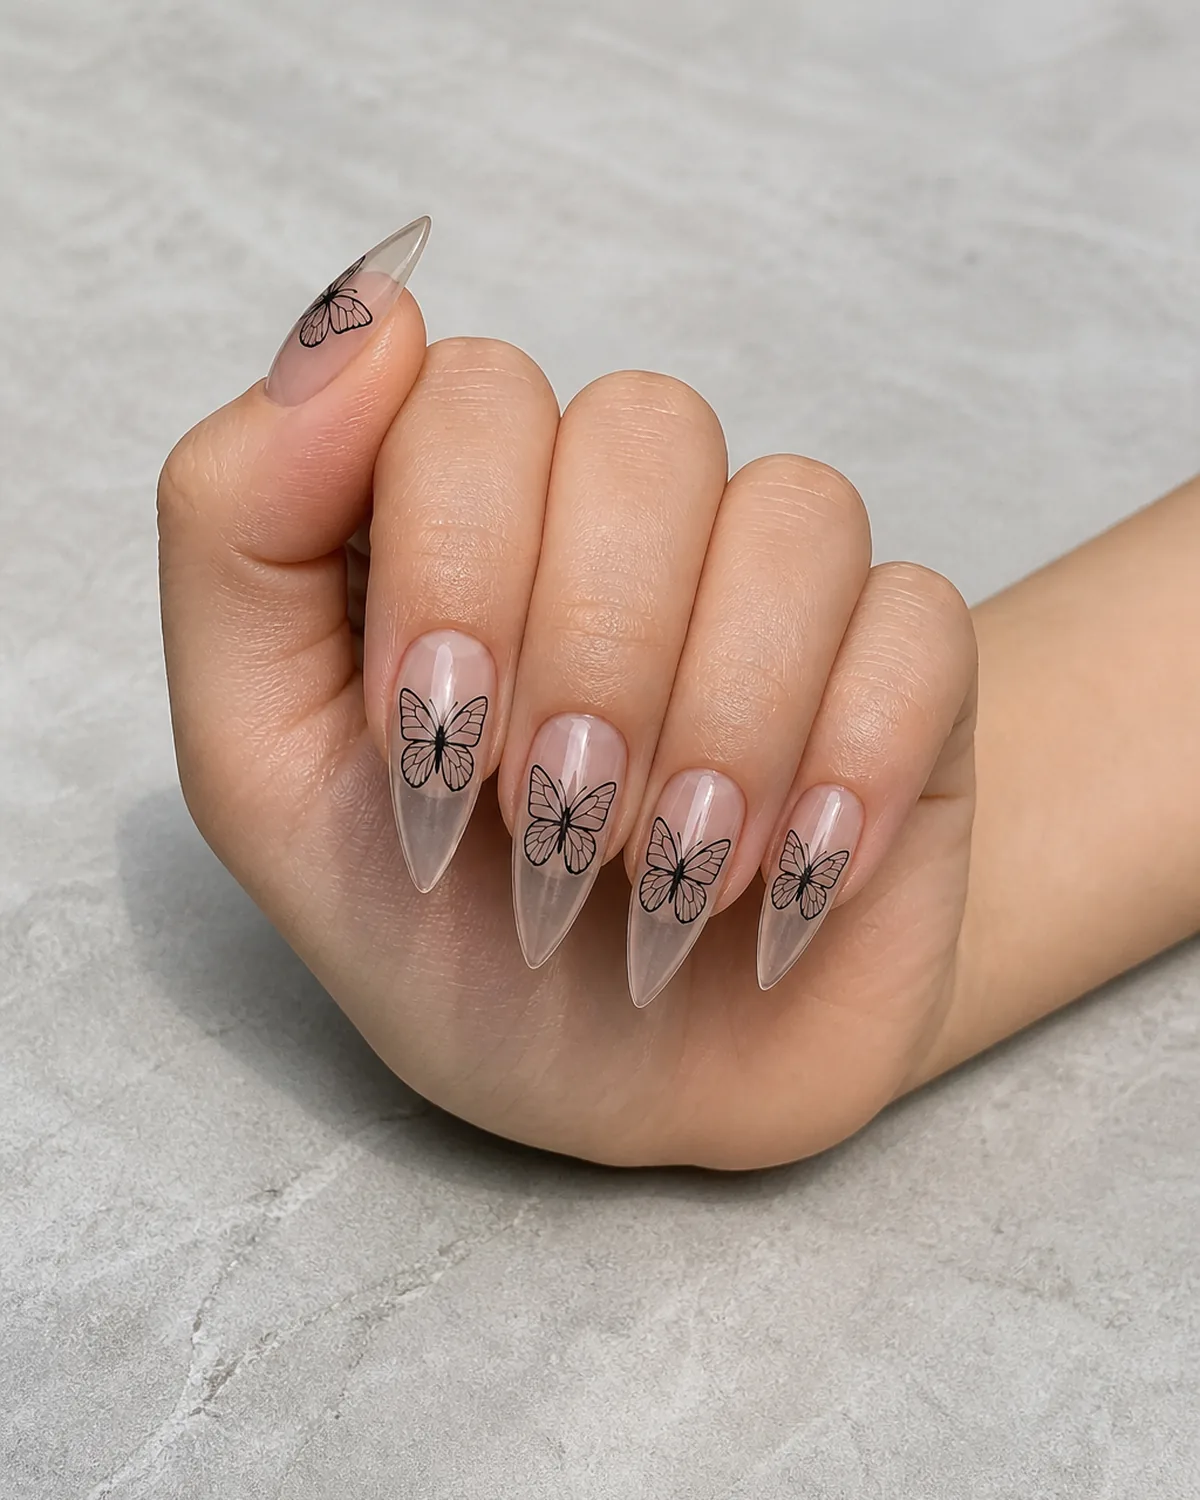
A single black outline butterfly on a clear or bare nail is the most minimal version of butterfly nail art. No fill, no color, just the wing silhouette in fine lines. The negative space — the nail itself showing through where the wings would be — is what makes this design elegant rather than empty.
Stiletto shape gives the butterfly enough canvas to read clearly, and the pointed tip adds an edgy quality that balances the delicate line work. The clear base means this pairs with any outfit without color-matching.
- Draw the butterfly with wings open and slightly asymmetric — perfectly mirrored wings look stiff, while a slight tilt gives the impression of flight
- Use a fine-tip nail art pen or a striper brush with black gel polish for the cleanest lines
- A glossy top coat over the clear base makes the outlined butterfly pop against the shiny surface
This is the beginner-friendly entry point in this roundup. If you like minimal nail art in general, see our minimalist nails guide for more stripped-back ideas.
Not sure where to start?
What's Your Butterfly Nail Style?
Pick the vibe that fits you, then jump to those ideas first.
4. Pastel Ombre Butterfly Accent on Coffin
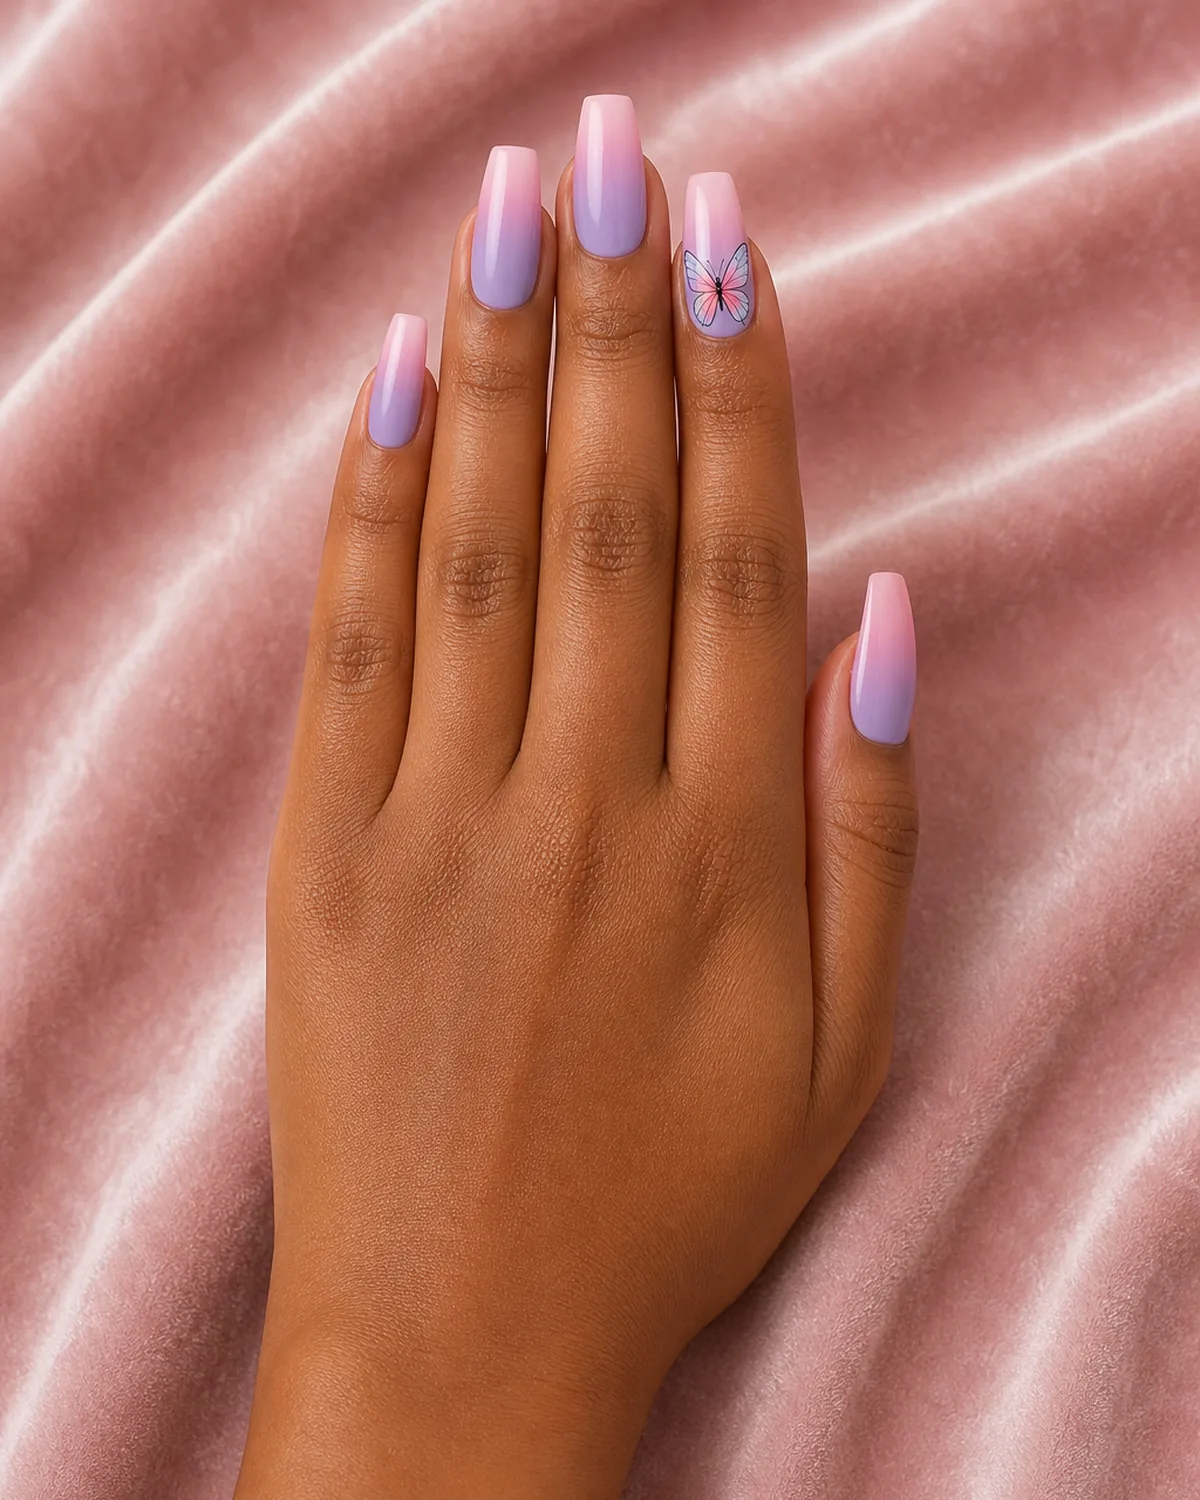
Lavender fading into pink across each nail creates a sky-at-sunset backdrop, and a single hand-painted butterfly on the ring finger gives the set a focal point without overwhelming the soft gradient. The accent butterfly works because the pastel ombre on the other nails provides enough visual continuity that one detailed nail does not look random.
Coffin shape gives the ombre gradient a long canvas to develop — the flat tip means the color transition has room to breathe. The squared-off end also gives the butterfly accent a wider surface to fill, which makes the wing details more readable.
- Paint the ombre first on all nails, then add the butterfly last so you can match its wing colors to the gradient tones already on the hand
- Use a sponge for the ombre transition — dab lightly in overlapping passes rather than pressing hard once
- The butterfly itself can be a simple symmetrical outline filled with pastel tones that echo the ombre
If you like coffin nails in general, the long flat surface is ideal for almost every design on this list.
5. Butterfly Wing Tip on Short Squoval
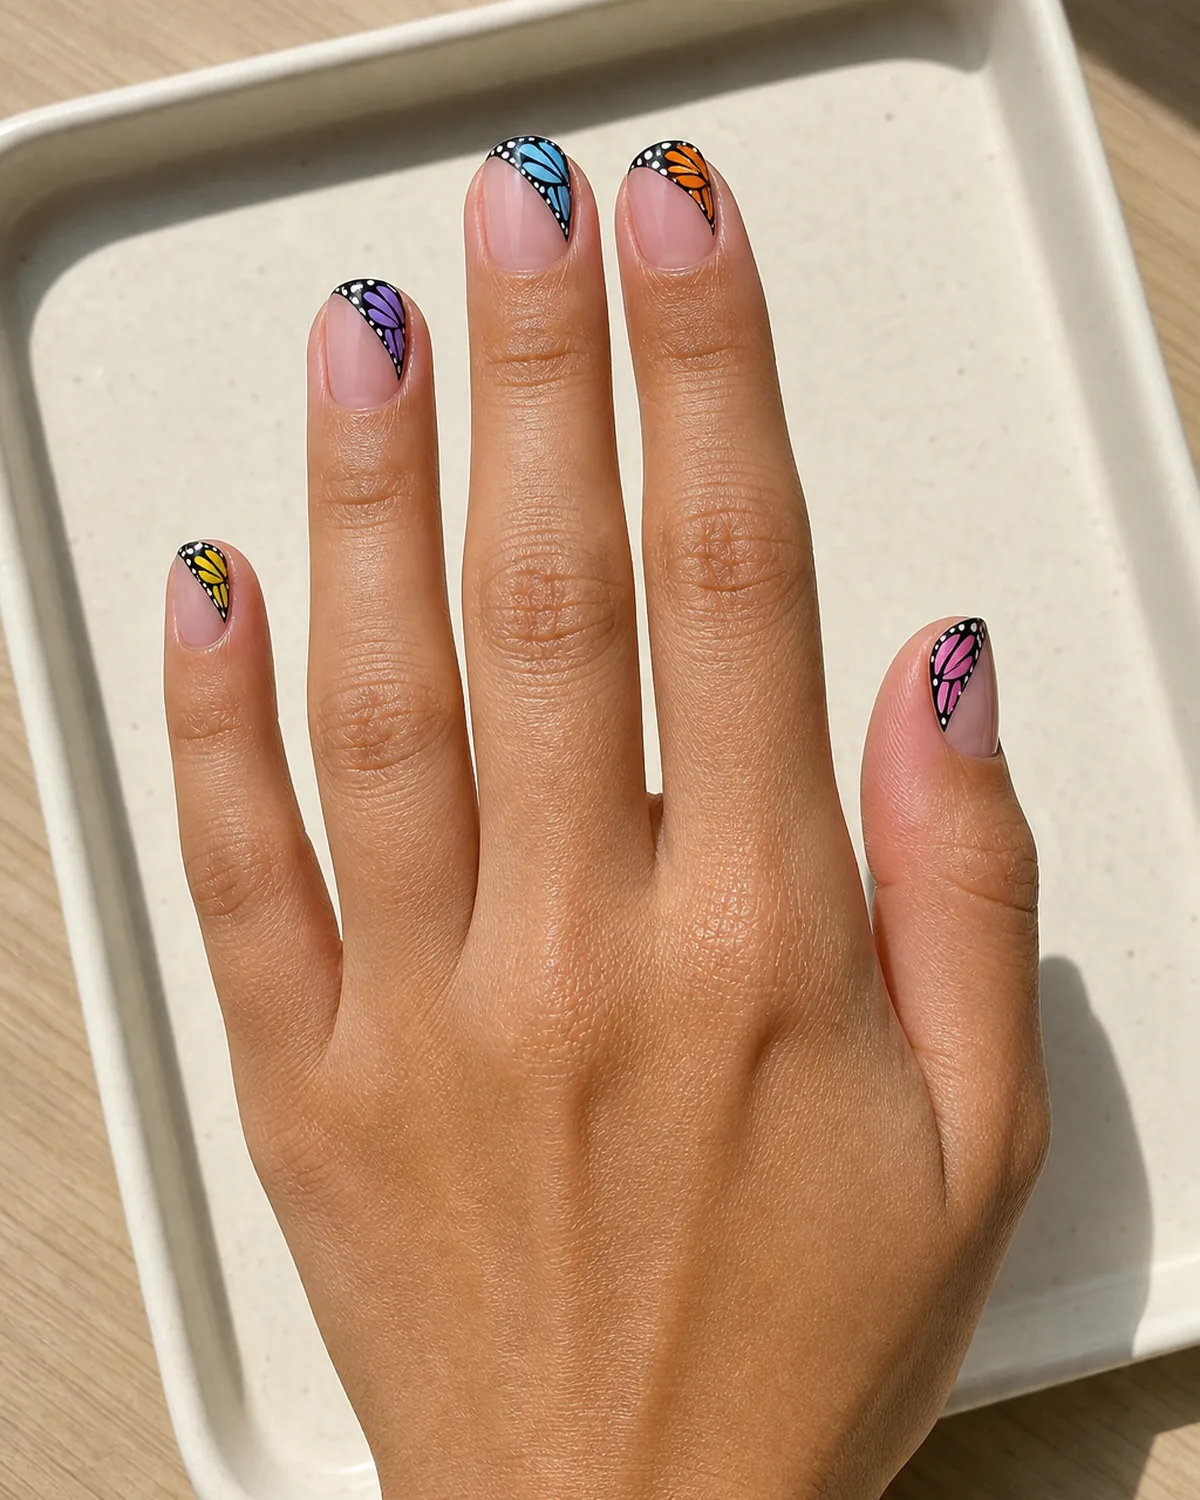
Instead of a straight French tip line, a colorful butterfly wing motif painted from the free edge inward replaces the clean-cut boundary with an organic curve. The wing shape naturally dips and rises across the nail, which gives each finger a unique silhouette while keeping the overall design cohesive.
Short squoval nails keep this practical. The flat edge at the tip gives the wing motif a clear starting boundary, and the compact length means the design stays proportional — on longer nails, the same motif might feel like it needs more detail to fill the space.
- Sketch a wing shape lightly before painting — the curve should dip lowest near the center of the nail and rise toward the sides
- Mix two or three colors within each wing (orange and black for monarch, blue and purple for morpho) to give the motif dimension
- Keep the base sheer pink or nude so the wing pattern is the only visual anchor
This gives you a butterfly reference without covering the entire nail. For more tip-based designs, see our colored French tips guide.
6. Gold Foil Butterfly on Black Almond
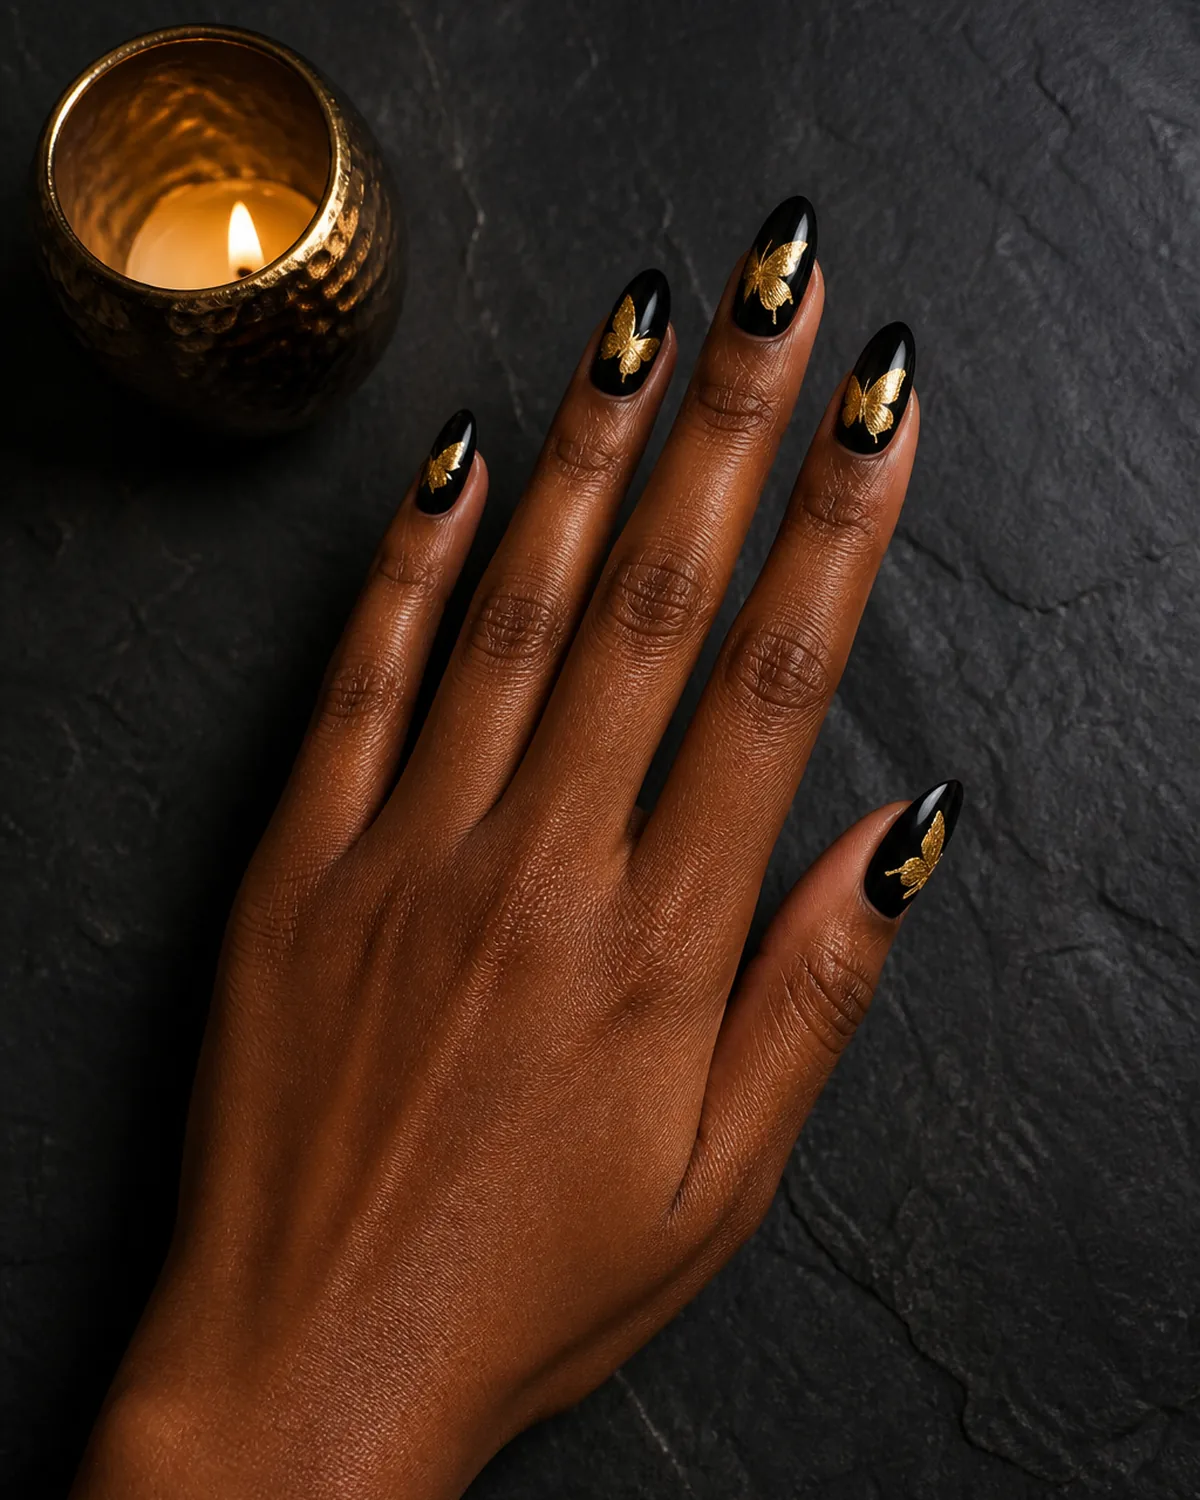
Gold foil pressed onto a glossy black base creates butterfly silhouettes with a texture that catches light in a way paint cannot replicate. The foil cracks and creases slightly as it adheres, which gives each butterfly a hand-finished quality that makes them look embedded in the lacquer rather than painted on top.
Almond nail designs pair well with this because the tapered shape echoes the pointed wings, and the dark base makes the gold pop without any additional design elements competing for attention.
- Apply the foil to tacky gel or a slightly wet top coat — it needs something to grip or it will flake off within hours
- Press the foil down firmly with a silicone tool, then peel back slowly so the butterfly shape transfers cleanly
- Pre-cut butterfly shapes from gold foil sheets, or use butterfly foil transfer sheets that come pre-shaped
This is one of the faster butterfly designs to execute since you are not painting each wing by hand. The application takes about five minutes per hand once you have the foil cut.
7. Stained Glass Butterfly on Medium Square
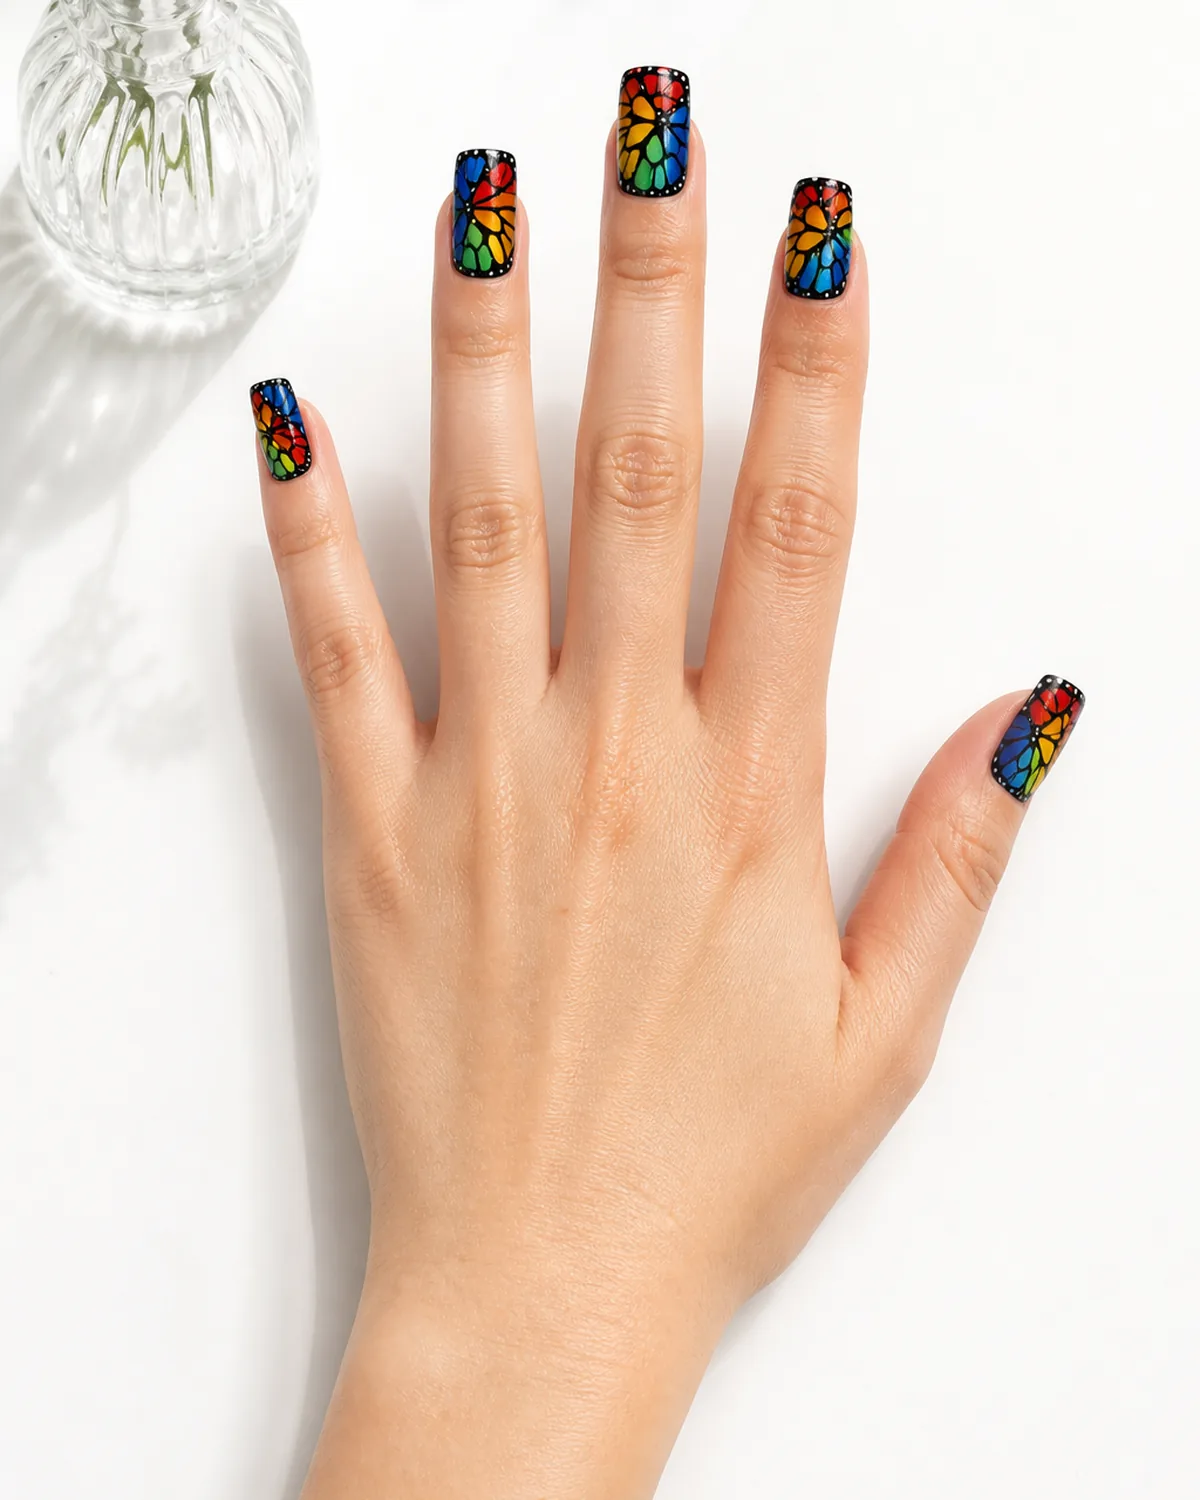
Bold sections of color — red, blue, yellow, green — separated by thin black outlines mimic the look of a stained glass window, but mapped onto a butterfly wing layout. Each nail becomes one panel of a larger wing, with the black lines doing the structural work that holds the composition together.
Medium square nails give each color section enough area to read clearly. The straight edges of the square shape also complement the geometric quality of stained glass, where every piece has a defined boundary.
- Paint the black outlines first to create the cell structure, then fill each section with color — this keeps the lines sharp
- Use a jelly or sheer polish for the color fills so they look translucent like actual stained glass
- Each nail can be a different section of the wing, which means no two nails need identical color placement
This is the most labor-intensive design on the list, but the payoff is a set that looks genuinely artistic. The graphic quality means it photographs well for social media.
8. Holographic Butterfly Wing on Long Coffin
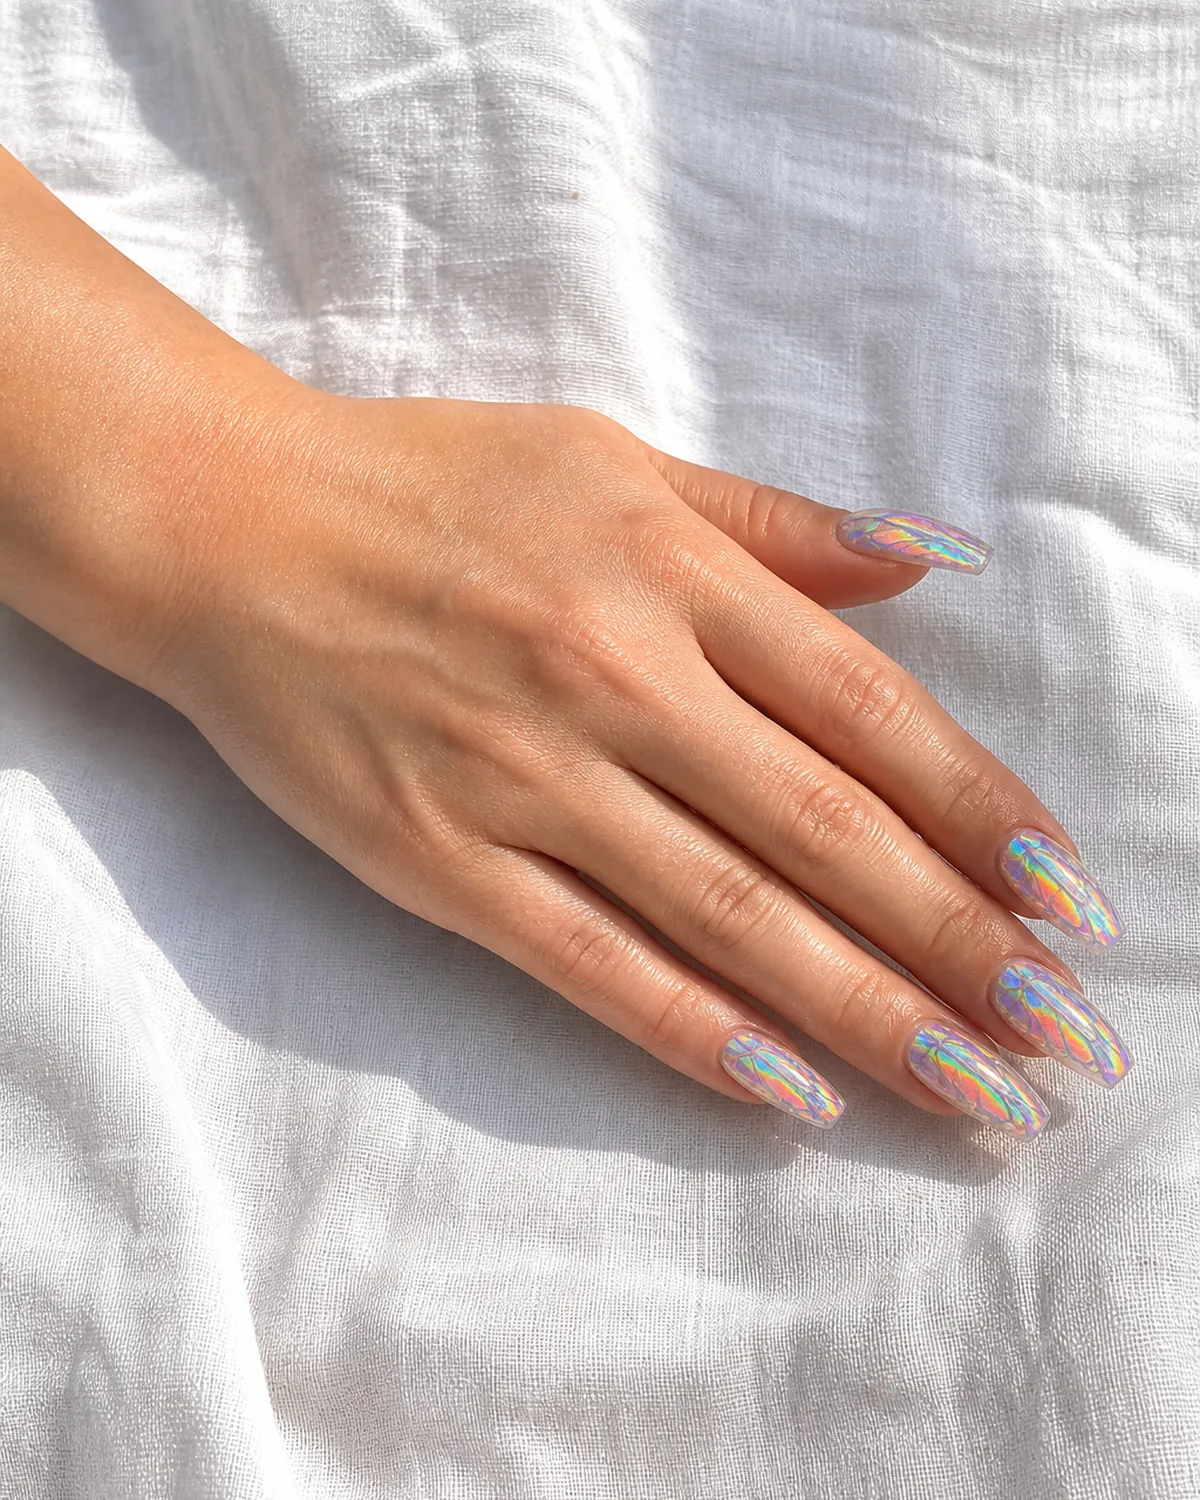
A clear holographic or duochrome top coat over a sheer base creates butterfly wing shapes that only appear when the light hits at certain angles. The prismatic rainbow effect mimics how real butterfly wings use micro-structures rather than pigment to produce their color — the nail version works the same way, shifting from invisible to iridescent as you move your hand.
Long coffin nails maximize the surface area for the holographic shift to travel across, which makes the wing effect more dramatic. The length also lets you see the full gradient from one color to the next without cramming it into a short space.
- Layer one coat of holographic top coat and let it cure fully before adding a second — two thin coats give more depth than one thick one
- Skip an opaque base color entirely; the holo effect is strongest over clear or barely-there pink
- Under indoor lighting the effect is subtle; in direct sunlight it explodes into rainbow
For more on finish-driven designs, browse our chrome nails guide.
Make it last
How to Paint Butterfly Nail Art That Actually Looks Like Wings
Butterfly designs have more detail than most nail art. These four steps keep the wings sharp instead of muddy.
9. Pressed Flower and Butterfly on Nude Oval
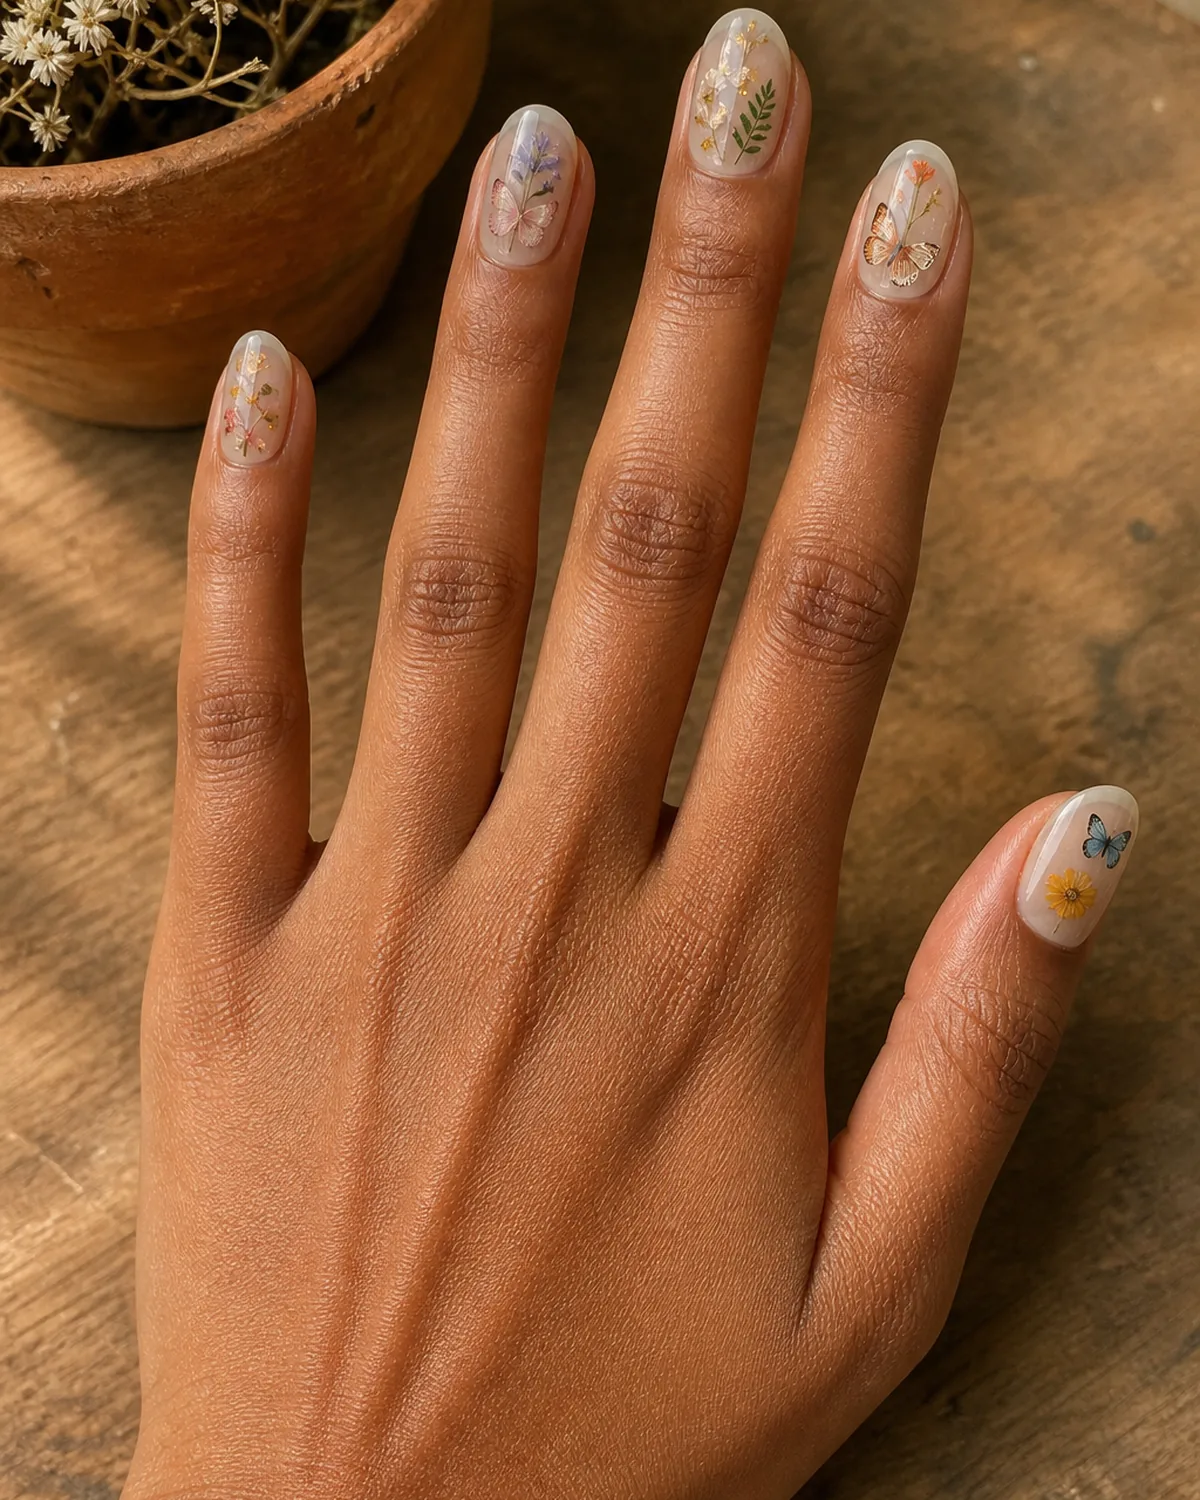
Tiny dried-flower-style and butterfly decals embedded under a gel top coat create a botanical garden look that sits flush with the nail surface. The pressed effect — where the decals appear to be under glass — gives this design a keepsake quality, like a specimen page from a naturalist's notebook.
Oval nails and the rounded shape soften the botanical feel. The nude base lets the decals be the sole visual element, and the sheer milky tone gives each piece a warm backdrop that reads as daylight.
- Place decals on a tacky or semi-cured gel base so they stick before the top coat goes on
- Press each piece flat with a silicone tool — any lifted edge will create an air bubble under the top coat
- Mix butterflies with small floral elements (pressed petals, tiny leaves) to create a garden composition rather than just scattered motifs
This is the fastest design on the list if you use pre-made decals. The result looks intricate without requiring any freehand painting.
10. Black and White Butterfly Sketch on Matte White Almond
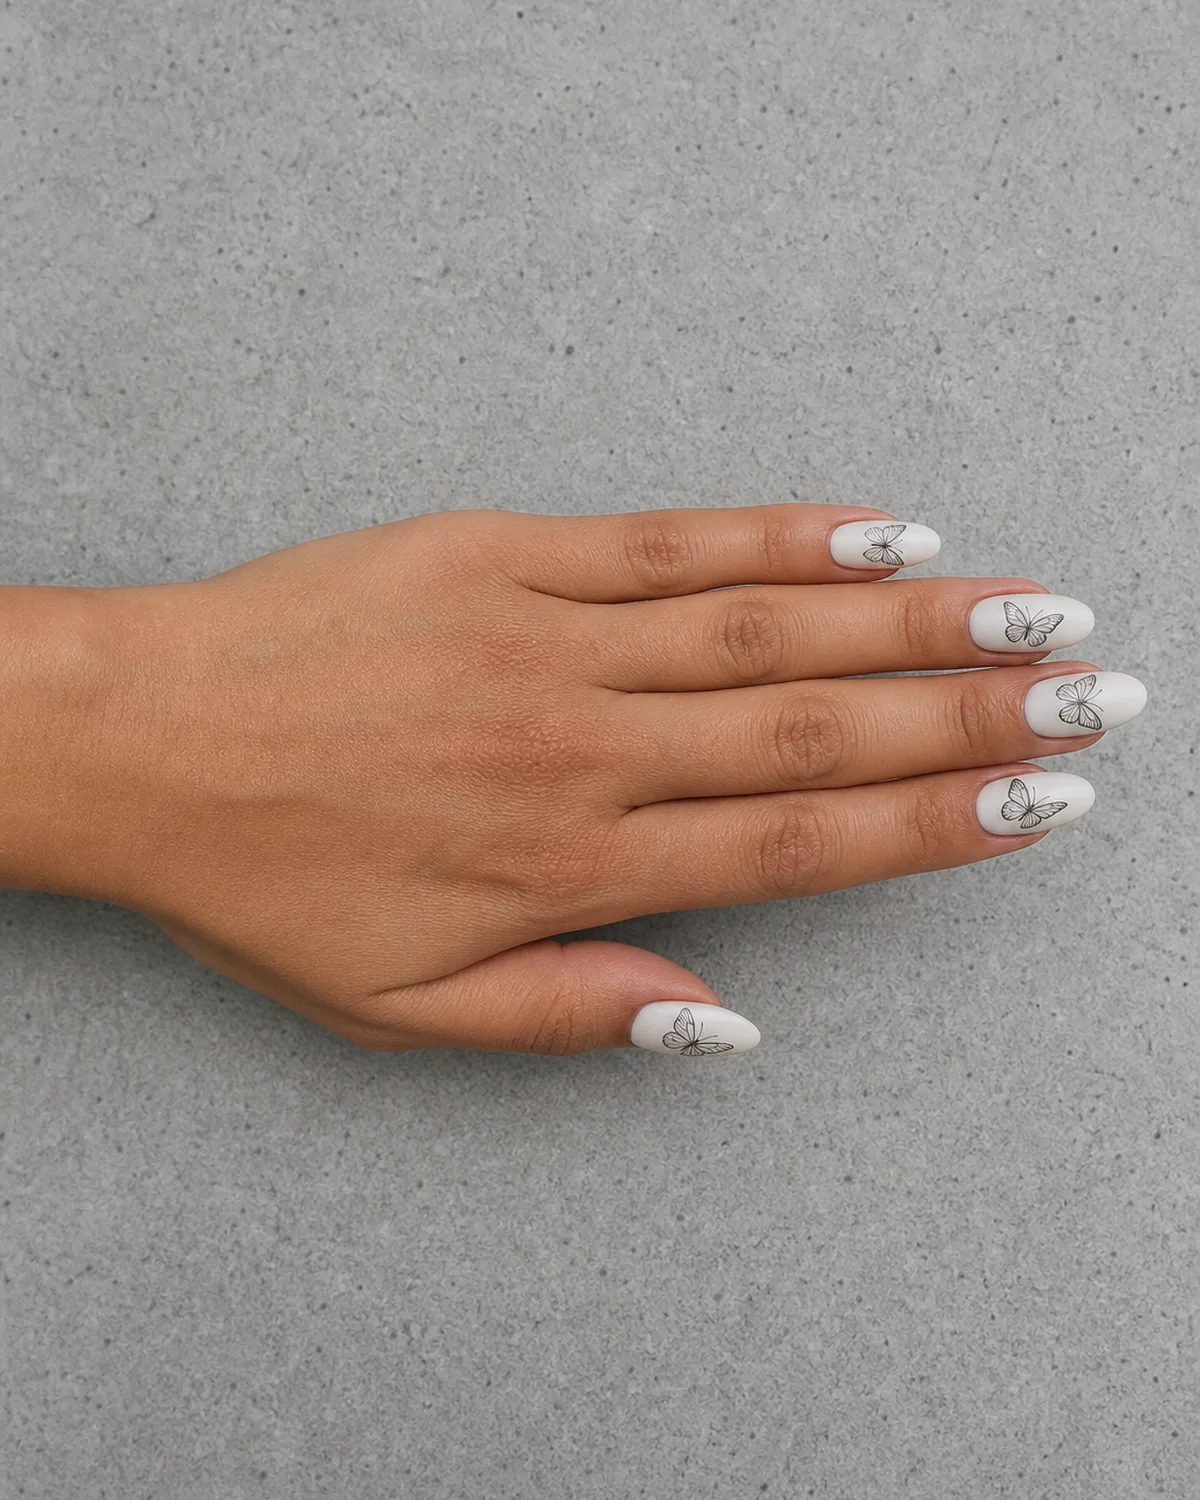
Fine black line-drawn butterflies in different flight poses across a matte white background create a pencil-sketch aesthetic that looks illustrated rather than decorative. Each nail shows a different butterfly position — wings up, mid-flutter, resting — which gives the hand a sense of motion across the set.
Matte white is the key to making this work. A glossy white base would compete with the fine lines; the matte finish absorbs light and pushes the black drawings forward, like ink on paper.
- Vary the size and position of each butterfly — one large butterfly spanning the center, another small one near the cuticle, a third at the tip — so no two nails look the same
- Use a nail art pen rather than a brush for the cleanest sketch lines
- Keep the matte finish as the final step — apply matte top coat last, and do not add glossy accents
For more ideas that strip nail art to its essentials, see our minimalist nails guide.
11. Pink Butterfly on Chrome Silver Coffin
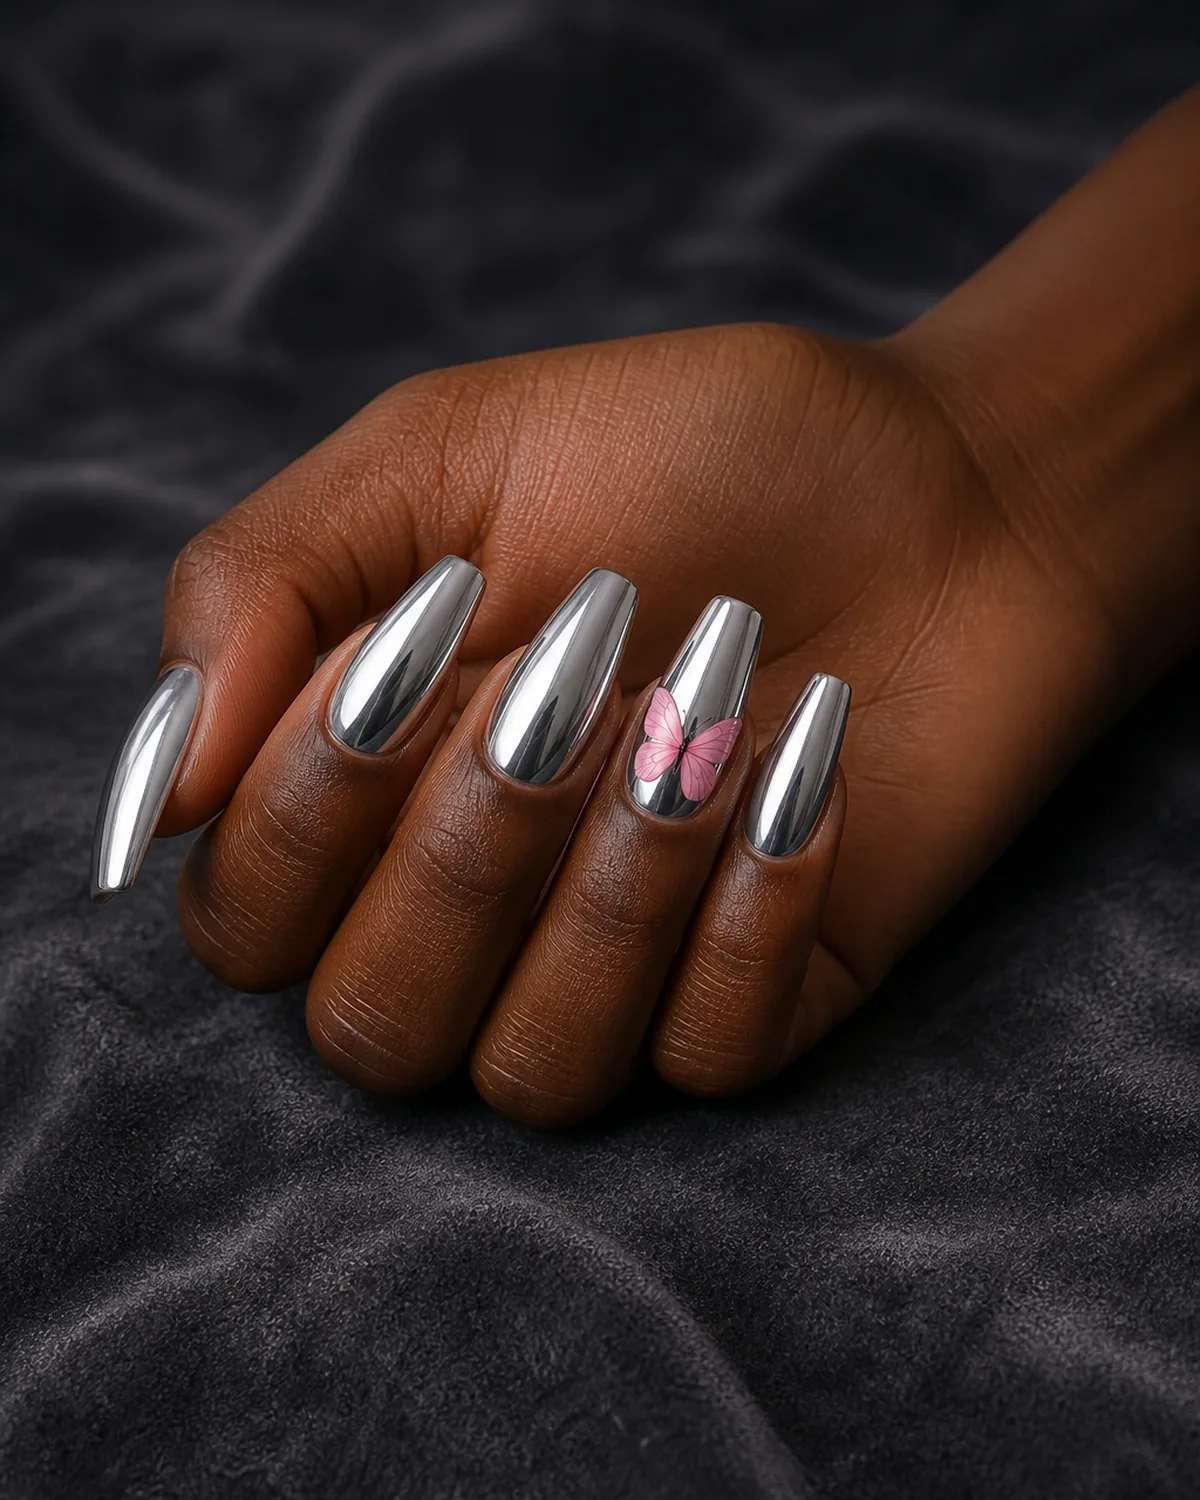
Chrome silver mirror nails with a single soft pink butterfly on one accent nail create a contrast between industrial finish and natural motif. The butterfly reads as delicate against the hard metallic surface, which gives the set a tension that makes both elements more interesting than either would be alone.
The coffin shape amplifies the mirror effect by giving the chrome a large, flat reflective area. The pink butterfly softens what would otherwise be an aggressively modern set.
- Apply the chrome powder on a no-wipe gel top coat for the smoothest mirror finish — any texture underneath will show through
- Paint the butterfly in soft pink tones (blush, rose, baby pink) that contrast gently with the silver rather than competing
- Place the butterfly on the ring finger for the traditional accent nail placement, or on the middle finger for more visibility
This combines two trends — chrome nails and butterfly art — into a single set that works for both day and evening.
12. Swallowtail Wing Gradient on Long Oval
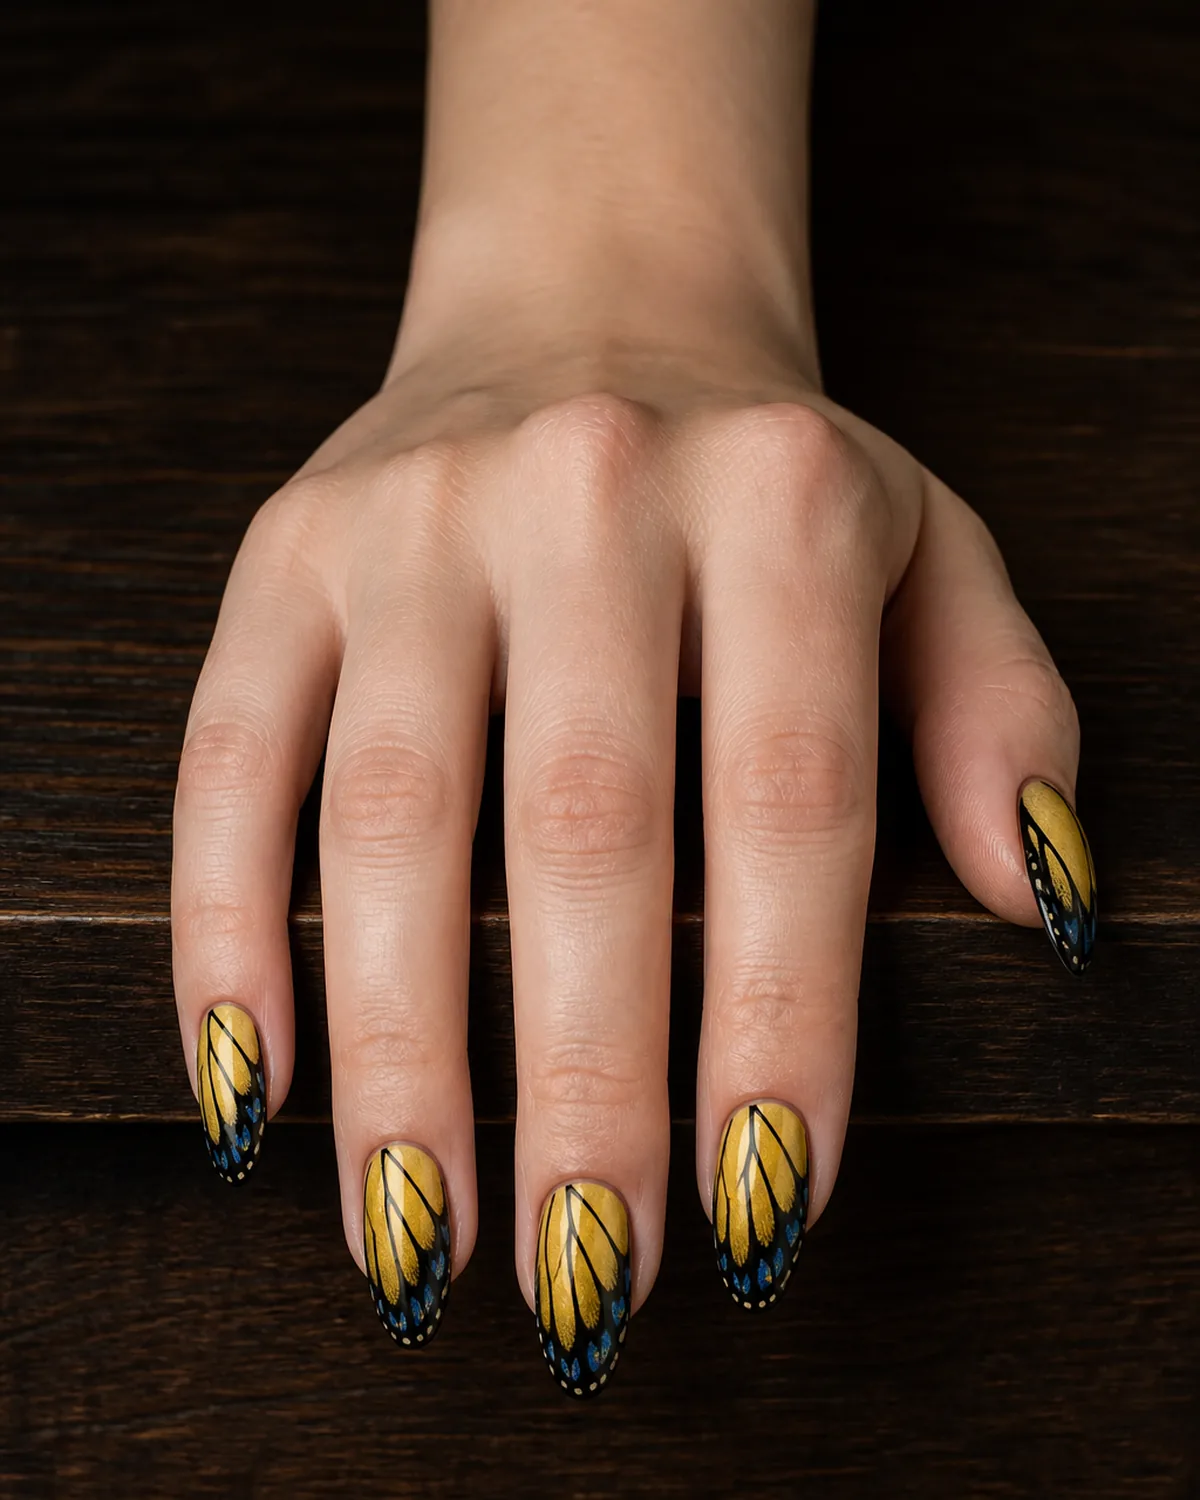
Yellow fading to black at the tips with small blue accent spots mimics the exact color pattern of an eastern tiger swallowtail butterfly wing. This is one of the most species-specific designs in the roundup — someone who knows butterflies will recognize the reference immediately.
Long oval nails give the gradient enough length to transition smoothly from bright yellow at the cuticle through golden amber in the middle to black at the tip. The oval tip mirrors the rounded edge of a swallowtail's wing.
- Sponge the gradient in three stages: yellow at the base, amber in the center, black at the tip — blend the overlap zones while wet
- Add the blue spots with a dotting tool after the gradient is dry — two or three small dots clustered near the black zone
- A glossy top coat makes the gradient glow and the blue spots pop against the dark background
This design works on any nail length, but the longer the nail, the more gradual and realistic the gradient reads.
13. 3D Butterfly Charm on Nude Almond
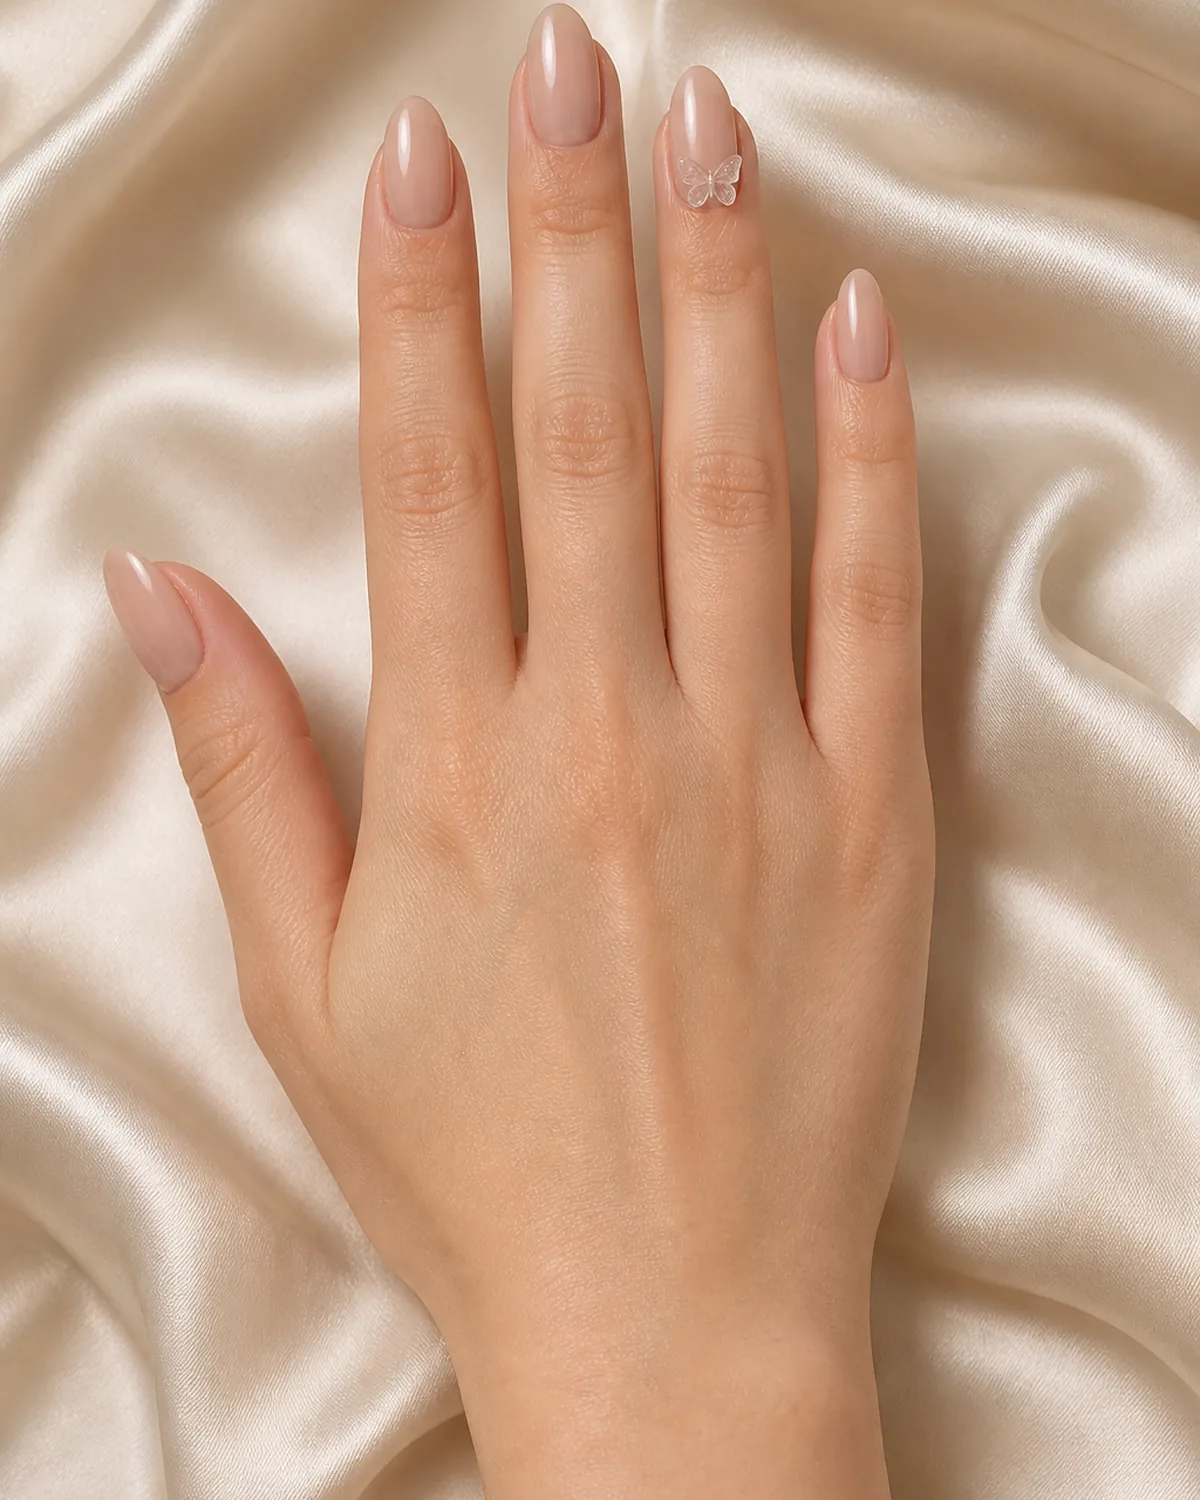
A small 3D resin or acrylic butterfly charm glued near the cuticle on one nail adds a physical, sculptural element that flat paint cannot match. The charm casts a tiny shadow and catches light differently than the nail surface, which gives the set dimension that reads as jewelry rather than nail art.
Nude almond nails keep the rest of the hand clean so the charm is the sole point of interest. The almond shape is refined enough to support a single embellishment without looking cluttered.
- Use nail glue designed for charms, not regular top coat — the bond needs to withstand daily use without popping off
- Place the charm near the cuticle rather than the tip so it sits in a protected area and catches on fewer things
- Choose a translucent or opalescent charm so it lets light through, which looks more delicate than an opaque one
For more on three-dimensional nail art, see our 3D nails roundup.
14. Emerald Green Butterfly on Matte Nude Coffin
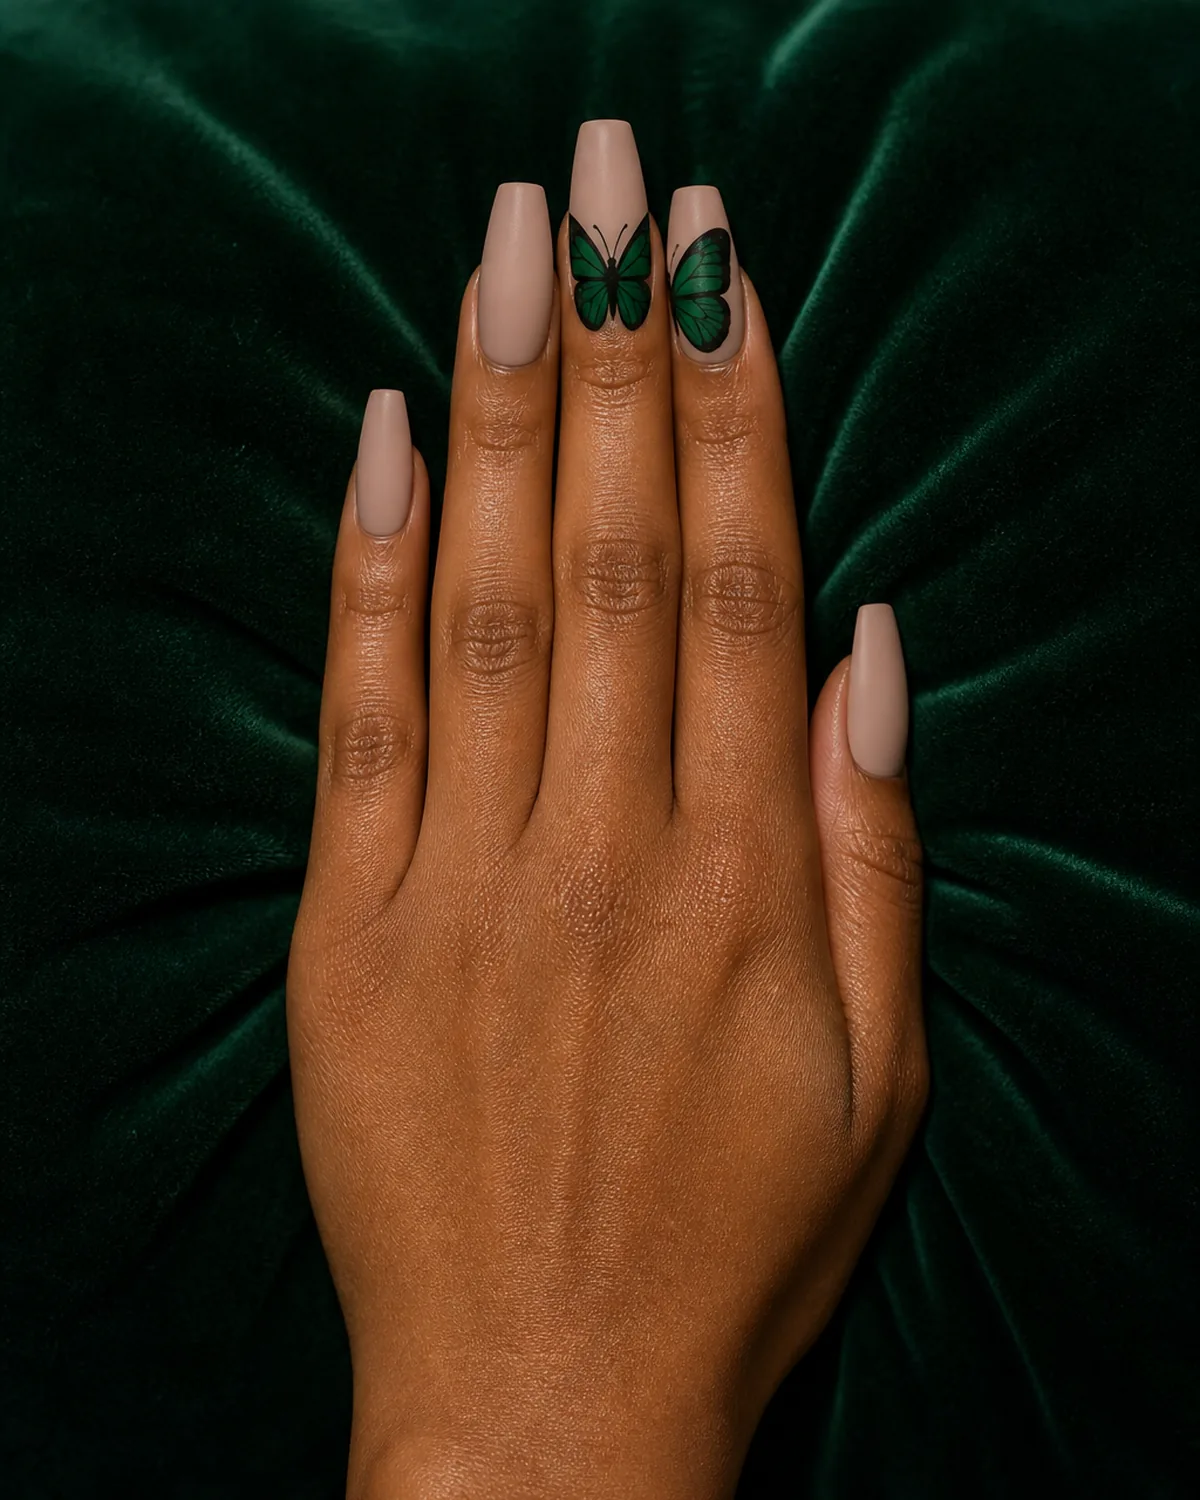
A rich emerald green butterfly painted across two adjacent nails — ring and middle finger — so the wings span both nails and form a continuous image when the fingers are held together. The matte nude base on the other nails keeps the green butterfly as the single dramatic element.
This split-wing concept works because coffin nails placed side by side create a nearly continuous surface. The flat tips meet cleanly, which lets the wing design flow from one nail to the next without an awkward gap.
- Position the butterfly body along the seam where the two nails meet when fingers are together — each nail carries one full wing
- Use a deep, saturated emerald rather than a light green; the richness reads as jewel-toned and dramatic against the nude base
- Paint both nails at the same time (or reference a sketch) so the wings are symmetrical when the fingers close
The two-nail spanning technique is the most advanced approach in this roundup but creates the single most striking result.
15. Sunset Ombre Butterfly on Round
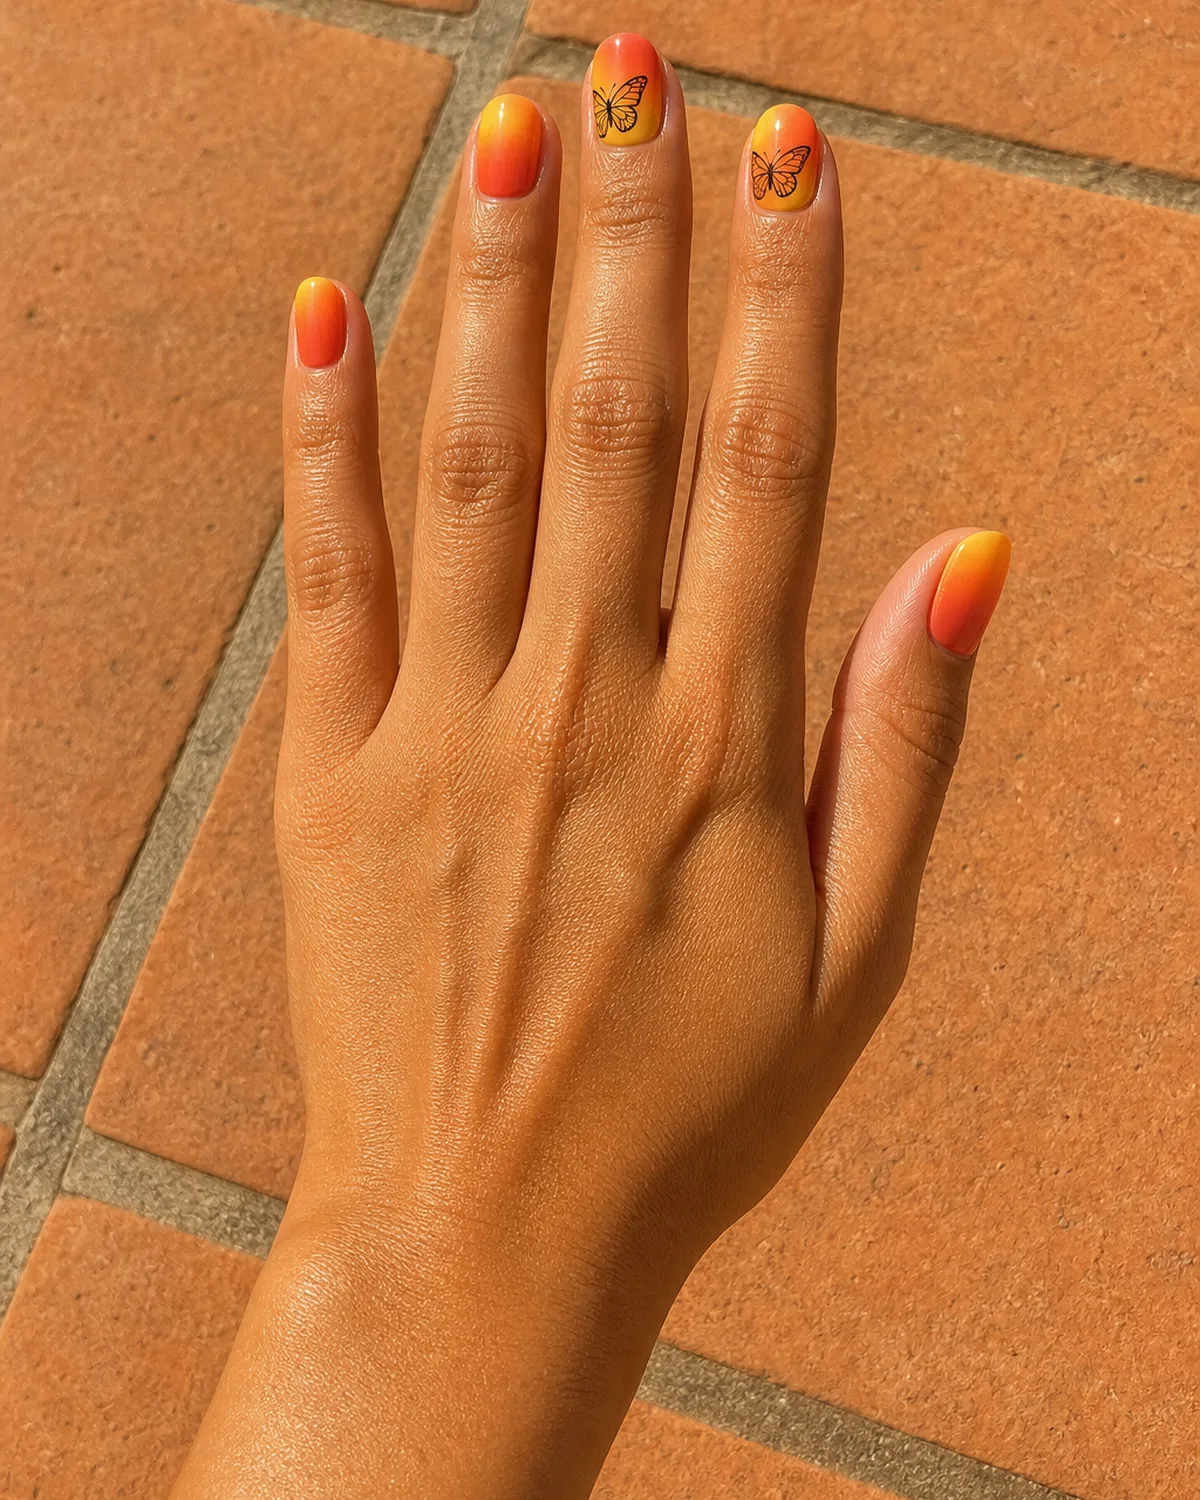
A warm sunset gradient — golden yellow fading through coral to deep orange — across all nails, with delicate black butterfly outlines on two accent nails. The warm tones evoke the golden hour light that makes real butterflies most visible, and the black outlines add structure without competing with the gradient.
Round nails soften the overall look and make the sunset palette feel organic rather than graphic. The gentle curve of the nail edge matches the natural curve of butterfly wings.
- Sponge the gradient from yellow at the cuticle through coral in the middle to burnt orange at the tip — keep the transitions soft
- Draw the butterfly outlines after the gradient is fully dry so the black lines sit on top without smearing
- Two accent nails (ring and middle) with butterflies is enough; more would crowd the gradient that carries the design
This closes the roundup on a warm, wearable note. For more gradient inspiration, see our full ombre nails guide. And if you are exploring spring nails 2026, butterfly motifs are one of the season's strongest trends.
15 Butterfly Nail Ideas to Try
- 1Monarch wing tipsOrange and black monarch wing patterns painted from the tip inward on nude almond nails.
- 2Blue morpho watercolorIridescent blue watercolor wash mimicking morpho wing shimmer on short oval.
- 3Negative space butterflySingle black outline butterfly on clear stiletto, wings open, no fill.
- 4Pastel ombre accentLavender-to-pink ombre with one detailed pastel butterfly accent nail on coffin.
- 5Butterfly wing tipColorful wing motif replacing the tip line on short squoval, organic and bold.
- 6Gold foil on blackGold metallic foil butterfly silhouettes pressed onto glossy black almond nails.
- 7Stained glass butterflyBold color sections with black outlines mimicking stained glass wings on square.
- 8Holographic wingClear holographic top coat with prismatic butterfly wing shapes on long coffin.
- 9Pressed flower & butterflyDried-flower-style and butterfly decals under gel top coat on nude oval.
- 10Black & white sketchFine black line-drawn butterflies in flight poses on matte white almond.
- 11Pink butterfly on chromeChrome silver mirror finish with soft pink butterfly accent on coffin.
- 12Swallowtail gradientYellow-to-black gradient with blue accent spots mimicking swallowtail wings on long oval.
- 133D butterfly charmSmall resin butterfly charm near the cuticle on one nude almond accent nail.
- 14Emerald green wingspanRich green butterfly spanning two adjacent coffin nails for a continuous wing.
- 15Sunset ombre butterflyWarm sunset gradient with black butterfly outlines on two round accent nails.
styvea.com
Frequently Asked Questions
Can I do butterfly nails at home without nail art tools?
Yes. The negative space butterfly and pressed flower and butterfly designs need only basic supplies — a fine-tip nail pen and some decals. The gold foil butterfly uses pre-cut foil sheets that skip freehand painting entirely. Start with those before investing in liner brushes and dotting tools.
Do butterfly nails work on short nails?
They do, but the design choice matters. The blue morpho watercolor and butterfly wing tip are designed specifically for short nails. Avoid designs that span two nails (like the emerald green wingspan) on short lengths — the gap between short nails is proportionally larger and breaks the wing image.
What is the easiest butterfly nail design for beginners?
The negative space butterfly is the simplest — one outline per nail, no color fill, no blending. The pressed flower and butterfly is the next easiest since you apply pre-made decals rather than painting. Both look polished without requiring fine motor control or a steady hand.
How do I make butterfly nail art last longer?
Two coats of top coat, cured fully between layers, are essential. Butterfly designs have more texture than flat polish, which means more surface area for chips to start. Cap the free edge of each nail with top coat to seal the most vulnerable spot. Avoid acetone-based hand sanitizers for the first 24 hours.
Can I use nail stickers instead of painting butterflies?
Absolutely. Butterfly nail stickers and water-slide decals produce clean, detailed results that are difficult to match with freehand painting, especially for species-specific patterns like monarchs or swallowtails. Apply them over a cured base color, press out air bubbles with a silicone tool, and seal under two coats of top coat. The result is indistinguishable from hand-painted art in photos.

Sloane Avery edits Styvea, where she shares nail design ideas, shapes, colors, and at-home manicure how-tos for anyone who loves a good manicure. Every guide is reviewed for clarity, usefulness, image accuracy, and Pinterest-to-page alignment before publication. Visit the About page.