Almond Nail Designs: 15 Looks from Everyday Minimal to Full Glam
There is a reason the almond shape keeps winning. It tapers just enough to stretch a short nail bed, rounds off just enough to dodge the drama of a stiletto, and gives every single polish shade room to breathe. Whether you have ten minutes and one bottle of nude, or a full afternoon and a drawer full of chrome powders, the almond silhouette will meet you exactly where you are.
This guide sorts 15 almond nail designs into three tiers — Everyday Minimal, Elevated Everyday, and Full Glam — so you can jump straight to the section that matches your mood, your calendar, or the number of tools you are willing to pick up today. Every look includes a difficulty rating, a wear-time estimate, and the almond lengths that show it off best. Grab a file and let’s go.

Why the Almond Shape Flatters Every Hand
Picture the cross-section of an actual almond. The sides taper inward from the widest point of your nail bed, then curve together into a soft, rounded peak. That geometry does two things at once: it creates a visual extension that makes fingers look longer, and it eliminates the blunt horizontal edge that can make wide nail beds look even wider. The result is a shape that reads elegant on slender hands and slimming on broader ones.
Compared to a true oval, the almond has a slightly narrower tip, which gives it a touch more personality without tipping into impractical territory. Compared to a coffin or ballerina shape, it ditches the flat, squared-off edge entirely, so there are no sharp corners to catch on fabric or crack under pressure. Nail technicians consistently rank the almond as one of the most durable shapes because the tapered sides distribute stress evenly instead of concentrating it at the corners.
The almond also happens to be a design playground. The tapered canvas draws the eye toward the tip, which makes accent art — a micro French line, a chrome fade, a tiny floral — naturally focal. And because the shape itself carries visual interest, even a plain single coat of color looks intentional. That is the foundation of every look below.

Everyday Minimal — Looks 1 through 5
These five designs are the “coffee-run-ready” tier. Each one uses a single technique, dries in normal time, and pairs with literally every outfit in your closet. If you are new to almond nails, start here.
Look 1 — Sheer Nude Gloss
One thin coat of a sheer nude that matches your skin tone, sealed with a high-shine top coat. That is it. The gloss catches light at every angle and lets the almond shape do all the talking. This is the look that makes people ask “are those your real nails?” — which, if you have filed natural nails into an almond, they literally are. Best on short-to-medium almond lengths where the sheer finish does not start to look translucent at a long free edge.
Difficulty: ★☆☆ Wear time: 5–7 days Best length: Short to Medium

Look 2 — Milky White Cloud Coat
A jelly-formula white polish creates a translucent, cloudy veil over the nail. The finish looks like frosted glass held up to daylight — soft enough to be neutral, interesting enough to stand on its own. Two thin coats give the best milky depth without going opaque. The almond tip peeks through with a gentle gradient effect because the jelly naturally pools slightly at the cuticle and free edge.
Difficulty: ★☆☆ Wear time: 5–7 days Best length: Any

Look 3 — Single-Shade Soft Pink
Think of this as the dependable best friend of almond nail designs. A mid-tone blush pink — not too sheer, not too Barbie — in two smooth coats gives the nails a polished, put-together finish that never clashes with anything. The key is choosing a pink that sits close to the natural flush of your nail bed so the color reads as an enhancement, not a statement. On deeper skin tones, a warm rose or dusty mauve delivers the same “elevated neutral” effect.
Difficulty: ★☆☆ Wear time: 5–7 days Best length: Any

Look 4 — Micro French Tip
Forget the thick white crescent of the early 2000s. The modern micro French tip is a razor-thin line of white, cream, or soft pastel traced along the very edge of the almond peak. It takes a steady hand or a thin striping brush, but the payoff is huge — the design adds definition to the almond silhouette without competing with it. On short almonds the line visually extends the free edge and makes nails look a touch longer than they really are.
Difficulty: ★★☆ Wear time: 5–7 days Best length: Short to Medium

Look 5 — Neutral Ombré Fade
A nude-to-white gradient sponged onto the almond shape creates a seamless, ethereal finish that looks far more complicated than it is. Cut a small makeup sponge into a wedge, dab your two shades side by side on a plastic surface, and pat onto the nail in light layers. Three to four pats usually builds the gradient to a smooth transition. Seal with a glossy top coat to blend any remaining texture. The almond tip catches the lightest shade, creating a natural glow at the peak.
Difficulty: ★★☆ Wear time: 5–7 days Best length: Medium

Elevated Everyday — Looks 6 through 10
These five designs add one special technique — chrome powder, a magnet, a sponge diffusion, or a precise brush line — to take your almond nails from “nice” to “where did you get those done?” They are date-worthy, brunch-worthy, and still office-appropriate.
Look 6 — Glazed-Donut Chrome
The glazed-donut finish starts with a nude or light-pink gel base cured to a no-wipe state. While the surface is still slightly tacky, press a pearlescent or white chrome powder onto the nail using a silicone applicator or foam eyeshadow brush. Burnish in small circular motions until the nail shifts between pearl and mirror depending on the angle of light. Seal everything with a glossy gel top coat and cure once more.
The almond shape is arguably the best canvas for this effect because the tapered tip acts like a prism — it catches a concentrated band of light right at the peak. On shorter almonds the chrome feels subtle and expensive. On longer almonds it starts to approach editorial territory. Either way, the finish lasts until the gel grows out, typically two to three weeks with minimal chipping.
Difficulty: ★★☆ Wear time: 14–21 days (gel) Best length: Any

Look 7 — Blush Aura Nails
Aura nails borrow the visual language of aura photography — a soft orb of color radiating outward from the center of the nail into a lighter or white border. The technique is simpler than it looks. Start with a white or very pale pink base. Once it is dry or cured, dab a small amount of blush, peach, or soft pink polish onto the center of the nail using a clean makeup sponge. Pat gently and repeatedly, diffusing the color outward but keeping the concentration strongest in the middle.
On the almond shape, the tapered sides create natural negative space that frames the color burst beautifully. The glow effect follows the contour of the nail and fades right where the taper begins, giving the design an organic, almost living quality. Keep the center shade soft for a “blushing from within” effect, or punch it up with a brighter coral for a more obvious aura.
Difficulty: ★★☆ Wear time: 5–7 days (regular); 14–21 days (gel) Best length: Medium to Long

Look 8 — Half-Moon Accent
The half-moon manicure flips the French tip concept upside down: instead of painting the free edge, you highlight the lunula — the crescent-shaped area at the base of the nail near the cuticle. Use a reinforcement sticker or a thin brush to mask or paint a contrasting arc in a deeper shade (burgundy on nude, navy on blush, chocolate on cream). Peel the guide, clean any bleed with a detail brush dipped in remover, and top coat.
On almond nails the half-moon creates a visual anchor at the base while the naked or contrasting tip draws the eye upward along the taper. The two focal points give the overall design a balanced, art-deco quality that reads sophisticated without effort.
Difficulty: ★★☆ Wear time: 5–7 days Best length: Medium

Look 9 — Pastel French Color Block
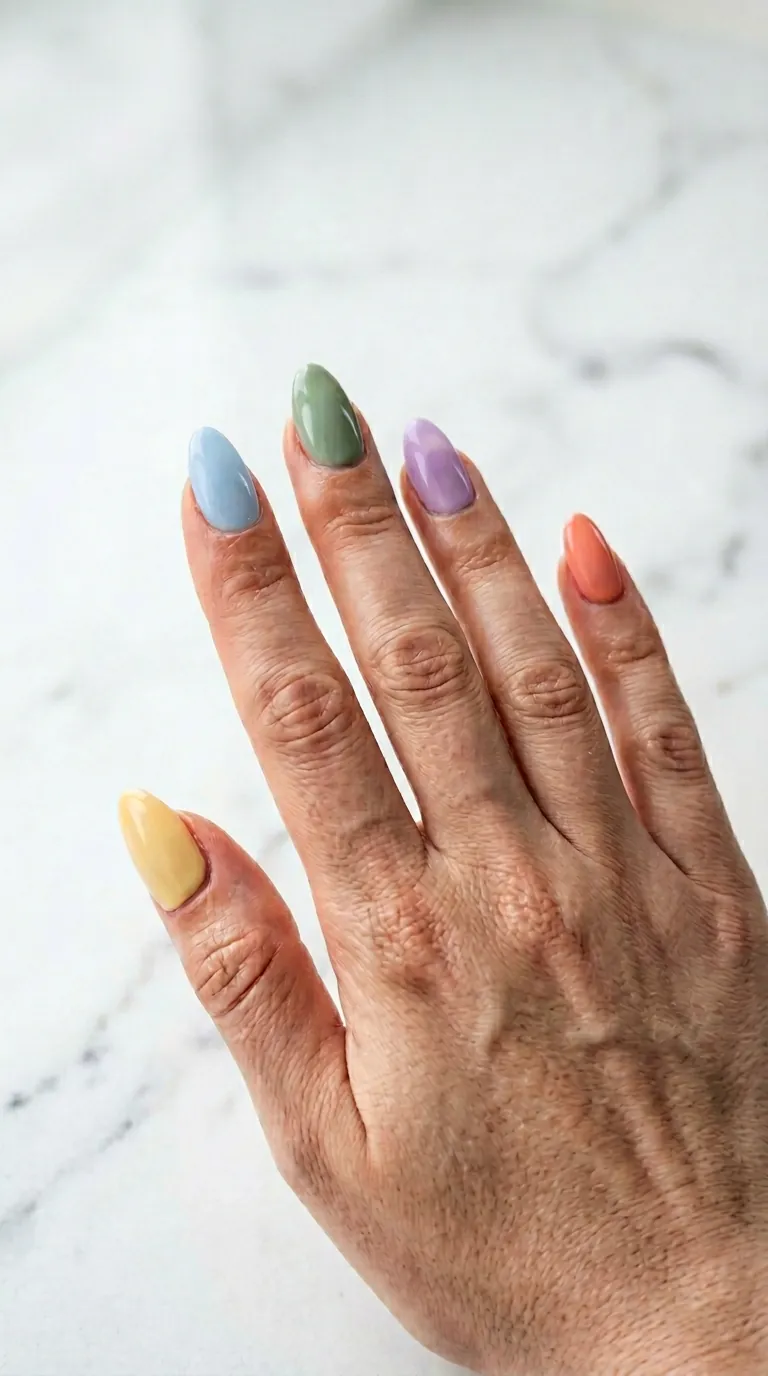
Replace the classic white French tip with a bold pastel block — lavender, mint, butter yellow, or baby blue — that covers the upper third of the nail. The line where the pastel meets the nude base is kept deliberately clean and straight (or gently curved to follow the almond peak). The contrast between the soft pastel and the warm nude base gives the manicure a fresh, playful energy without the chaos of a full nail-art design.
Mix shades across fingers for a skittle-style variation: index in lavender, middle in mint, ring in butter yellow, pinky in baby blue. The almond shape keeps the whole set cohesive because the consistent silhouette unifies even mismatched colors.
Difficulty: ★★☆ Wear time: 5–7 days Best length: Medium to Long
 over a nude base")
Look 10 — Cat-Eye Swirl
Magnetic gel polish contains tiny iron particles that respond to a magnet held above the wet surface. On an almond nail, hold a round or bar magnet at a slight angle above the center of the nail for about five to ten seconds. The particles migrate toward the magnet and form a concentrated band of light — the classic “cat-eye” stripe. Tilt or rotate the magnet slowly during those seconds and the stripe bends into a mesmerizing swirl that follows the curve of the almond shape.
The color shifts as the nail moves in light, creating a three-dimensional illusion that flat polish simply cannot achieve. Deep shades like emerald, sapphire, or espresso produce the most dramatic swirl, while lighter shades like sage or dusty rose give a subtler, daytime-friendly version. Cure immediately after positioning the magnet so the particles freeze in place.
Difficulty: ★★☆ Wear time: 14–21 days (gel) Best length: Any

Full Glam — Looks 11 through 15
These five designs are the ones you save for the moments that matter — weddings, birthday dinners, vacations, or the random Tuesday when you just want to feel like art. They require more tools, more patience, and more curing time, but the results stop people mid-sentence.
Look 11 — Hand-Painted Botanical Florals
Tiny flowers painted directly onto a nude, white, or soft pastel base using a fine detail brush and acrylic or gel paint. Start with the petal shapes first — small comma strokes pulled outward from a central dot — then add leaves with a single tapered stroke in muted green. Finish with a dot of contrasting color in the flower center.
The almond shape offers a naturally tapered canvas that guides floral placement. Clustering the bouquet near the cuticle half of the nail lets the design “grow” toward the tip, while scattering individual petals near the peak keeps the taper visible. The result feels like a miniature watercolor painting and works beautifully as an accent on one or two nails paired with a matching solid shade on the rest.
Difficulty: ★★★ Wear time: 14–21 days (gel) Best length: Medium to Long

Look 12 — Crystal Encrusted Accent
Choose one or two nails — the ring finger is the classic pick — and build a cluster of tiny rhinestones, flat-back crystals, or micro pearls onto a tacky gel base. Arrange the largest stone near the center of the nail, then fill outward with smaller stones in descending size. Seal the edges with a clear builder gel to lock everything in place and prevent snagging.
The remaining nails stay clean in a matching nude or blush shade so the crystal accent gets all the attention. On the almond shape, the tapered tip provides a natural endpoint for the crystal cluster, preventing the design from looking bulky or overloaded. The key to longevity is proper encapsulation — a thin layer of clear gel over and around each stone, cured twice, ensures nothing pops off during daily life.
Difficulty: ★★★ Wear time: 14–21 days (gel with encapsulation) Best length: Medium to Long

Look 13 — Abstract Art Swirls
Bold, freeform swirl lines in two or three contrasting shades painted over a white or neutral base. Think Matisse cutouts translated onto a nail — organic curves, intentional imperfection, and confident color choices. Use a thin liner brush loaded with gel paint, and pull each stroke in a single fluid motion rather than trying to build it in sections. The beauty of abstract swirls is that slight imperfections actually enhance the artsy, hand-painted feel.
Color combinations that work well on almond nails: terracotta plus sage on cream, cobalt plus tangerine on white, lilac plus mustard on pale pink. The almond taper gives each swirl a natural direction to follow, making the freehand lines look deliberate rather than random.
Difficulty: ★★★ Wear time: 14–21 days (gel) Best length: Any

Look 14 — Metallic Gold Foil Marble
This design layers translucent polish and gold transfer foil to create an organic, marble-veined finish. Start with two coats of a sheer nude or soft ivory jelly polish as the base. While the final coat is still tacky (or apply a dedicated foil adhesive), press a sheet of gold transfer foil onto the nail with light, uneven pressure. Peel back the foil slowly — the gold will transfer in irregular, vein-like patterns wherever the adhesive made contact.
Distress the foil further by dabbing a dry brush over the surface before sealing. The imperfect, fractured gold lines mimic the natural veining of Calacatta marble. Seal with a high-gloss top coat for a glass-like depth, or a matte top coat for a stone-like texture. On almond nails the gold veins follow the taper and converge toward the tip, creating a visual flow that shorter, wider shapes cannot replicate.
Difficulty: ★★★ Wear time: 7–10 days (regular); 14–21 days (gel) Best length: Medium to Long

Look 15 — Mixed-Media Statement Set
The grand finale: every nail on one hand wears a different technique from this guide, unified by a single color palette. For example, pick a blush-and-gold palette and assign each finger a design — thumb gets the glazed-donut chrome, index gets the micro French tip, middle gets the botanical floral, ring finger gets the crystal accent, and pinky gets the gold foil marble. The shared color family ties everything together while the variety turns your hand into a walking portfolio of nail art.
Planning is the hardest part. Sketch your five designs on paper first, decide on a unifying base shade and one or two accent colors, then work nail by nail. Cure or dry each nail fully before moving on to prevent smudging between techniques. The mixed-media set is the ultimate showcase for the almond shape because the consistent silhouette acts as a visual frame — no matter how different the art is, the uniform taper tells your eye that all five nails belong together.
Difficulty: ★★★ Wear time: 14–21 days (gel) Best length: Medium to Long

How to Choose the Right Look for Your Lifestyle
Matching a design to your life does not require overthinking. The table below cross-references occasion, difficulty, and ideal almond length with specific look numbers so you can shortcut straight to the designs that make sense for your week.
| Occasion | Difficulty | Best Almond Length | Recommended Looks |
|---|---|---|---|
| Daily errands, office, school | ★☆☆ | Short to Medium | 1, 2, 3 |
| Casual date, brunch, weekend out | ★☆☆ – ★★☆ | Short to Medium | 4, 5, 6, 7 |
| Wedding guest, formal event | ★★☆ | Medium to Long | 8, 9, 10 |
| Night out, party, birthday | ★★★ | Medium to Long | 11, 12, 13 |
| Special event, photoshoot, vacation | ★★★ | Any | 14, 15 |
If you are unsure about length, medium almond is the sweet spot. It is long enough to showcase any design in this guide yet short enough to type, cook, and live normally. When in doubt, start with a Look from the Everyday Minimal section and work your way up as you build confidence with the shape.
Almond Nail Care — Keep the Shape Between Visits
Filing technique matters more than the file itself. Always stroke in one direction — from the outer edge toward the center tip — rather than sawing back and forth. Back-and-forth filing creates micro-fractures in the nail layers that lead to peeling and breakage within days. A 180-grit file is gentle enough for natural nails and precise enough to maintain the taper without thinning the sides too aggressively.
Cuticle care is the silent hero of any almond manicure. Dry, lifted cuticles pull attention away from even the most beautiful polish job and create entry points for moisture that cause lifting and chipping. Push cuticles back gently after a shower when the skin is soft, then apply a cuticle oil — any basic jojoba or vitamin-E blend will do — once in the morning and once before bed. Consistent oil use also keeps the nail plate flexible, which reduces the chance of a crack at the stress point where the taper begins.
If you wear regular polish, cap the free edge with every coat — base coat, color, and top coat. Capping means swiping the brush along the very tip of the nail so a thin seal of product wraps over the edge. This one step alone can add two or three extra days of wear because it blocks water from seeping under the polish and causing tip shrinkage. For gel wearers, the same principle applies during the base and top gel layers.
Frequently Asked Questions
Are almond nails good for short fingers?
Yes. The tapered sides of the almond shape create an optical illusion that stretches the finger line beyond the actual nail length. Pairing the almond shape with a sheer nude or light pink shade maximizes the elongating effect because the color blends seamlessly with the skin. Avoid very dark or opaque shades on short almonds if your goal is to lengthen, since high-contrast color can visually shorten the nail bed.
What is the easiest almond nail design for beginners?
Sheer Nude Gloss and Milky White Cloud Coat require zero tools beyond a bottle and a brush. They are single-technique, single-coat-friendly, and forgiving of uneven application because the sheer formula self-levels as it dries. If you want a tiny step up without a steep learning curve, the Neutral Ombré Fade only needs a makeup sponge and two shades.
How do I keep almond nails from breaking?
Three habits make the biggest difference. First, file in one direction only to prevent micro-fractures. Second, keep nails at a medium length rather than pushing for maximum length — the longer the free edge, the more leverage everyday tasks put on the taper. Third, moisturize cuticles and the nail plate daily with a simple oil to maintain flexibility. A strengthening base coat adds an extra layer of insurance if your nails are naturally thin or soft.
Can I do almond nail designs on natural nails?
Absolutely. Sheer nude, milky white, soft pink, micro French, neutral ombré, glazed-donut chrome, and aura nail designs all work beautifully on natural nails without any overlay. More elaborate designs like botanical florals, crystal accents, abstract swirls, gold foil marble, and mixed-media sets benefit from the added strength of a gel or acrylic overlay to prevent breakage and extend wear time.
What nail colors look best on almond-shaped nails?
Neutrals, blush tones, and soft pastels highlight the elegance of the tapered shape without competing with it. Chrome and pearlescent finishes amplify the almond’s natural light-catching ability. On deeper skin tones, warm rose, dusty mauve, and rich berry shades complement the almond silhouette beautifully. Dark shades like espresso, burgundy, or black create a bold, editorial look that works best on medium-to-long almonds where the taper is fully visible.